Configuring WSO2 SMSOTP Connector

This topic provides instructions on how to configure the SMSOTP and the Identity Server to integrate using a sample app. This is an updated version of the WSO2 article found here. The current SMSOTP connector can be easily used with nexmo but difficult to integrate with other SMS APIs. I have updated the connector to be easily integrable with most SMS APIs on the market. This is the updated documentation of the connector. 

Building the SMSOTP artifacts

  1. Clone the repository from https://github.com/Pulasthih/is-connectors
  2. Navigate to components/smsotp and build the two artifacts using mvn clean install.

Deploying SMSOTP artifacts

  1. Place the smsotpauthenticationendpoint.war file into the <IS_HOME>/repository/deployment/server/webapps directory.
  2. Place the  org.wso2.carbon.identity.authenticator.SMSOTP-1.0.0.jar file into the <IS_HOME>/repository/components/dropins directory.

Configuring the SMSOTP provider

The SMS provider is the entity that will be used to send SMS. The SMSOTP connector has been configured such that it can be used with most types of SMS APIs. Some use the GET method with the client secret and API Key being encoded in the URL (eg: Nexmo) whereas some may use the POST method while sending the values in the headers and the message and telephone number in the payload (eg: Clickatell). Note that this could change significantly between different SMS providers. The configuration of the Identity Server would also change along with this.

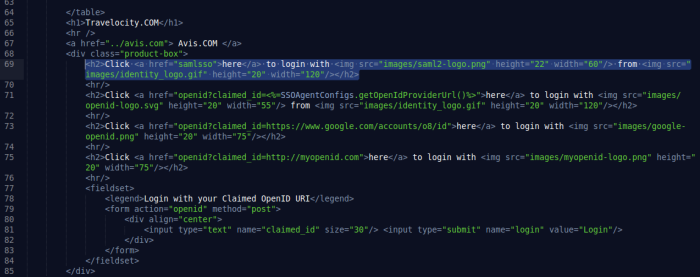
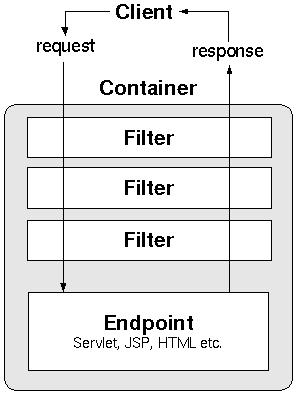
Deploying travelocity.com sample

The next step is to deploy the sample app in order to use it in this scenario.

Once this is done, the next step is to configure the WSO2 Identity Server by adding an identity provider and service provider.

Configuring the identity provider

Now you have to configure WSO2 Identity Server by adding a new identity provider.

  1. Download the WSO2 Identity Server from here and run it.
  2. Log in to the management console as an administrator.
  3. In the Identity section under the Main tab of the management console, click Add under Identity Providers.
  4. Give a suitable name (eg: SMSOTP) as the Identity Provider Name.
  5. Go to SMSOTP Configuration under Federated Authenticators .
  6. Select both checkboxes to Enable SMSOTP Authenticator and make it the Default .
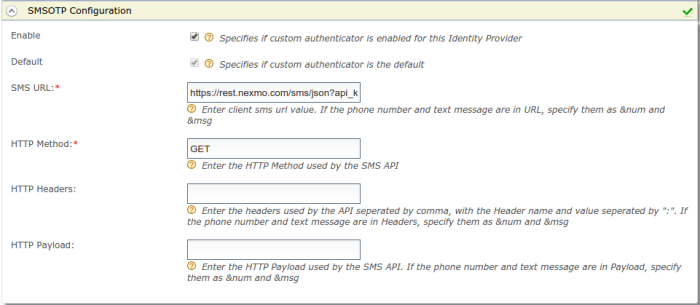
  7. Enter the SMS Url and the HTTP Method used (eg: GET or POST). Include the headers and payload if the API uses any. If the text message and the phone number are passed as parameters in any field, then include them as &msg and &num respectively.

Note: If nexmo is used as the SMS provider, the nexmo API requires the parameters to be encoded in the URL, so the SMS URL would be as follows,

https://rest.nexmo.com/sms/json?api_key=*********&api_secret=********&from=NEXMO&to=&num&text=&msg

*The api key and api secret are provided when you register with nexmo.

nexmo

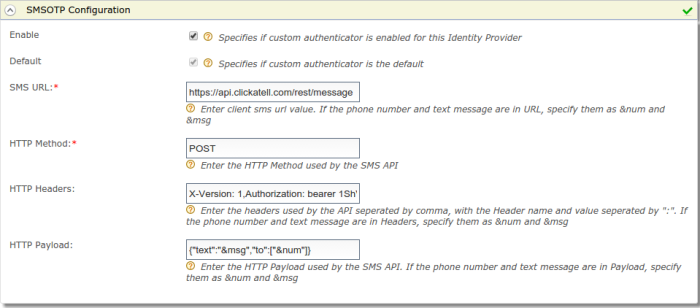
Note: If clickatell is used as the SMS provider, clickatell uses a POST method with headers and the text message and phone number being sent as the payload. So the fields would be as follows.

SMS URL: https://api.clickatell.com/rest/message

HTTP Method: POST

HTTP Headers: X-Version: 1,Authorization: bearer ********,Accept: application/json,Content-Type: application/json

HTTP Payload: {“text”:”&msg“,”to”:[“&num“]}

*The auth token is provided when you register with clickatell.

clickatell8. Click Register .

You have now added the identity provider.

Configuring the service provider

The next step is to configure the service provider.

1. Return to the management console.

2. In the Identity section under the Main tab, click Add under Service Providers .

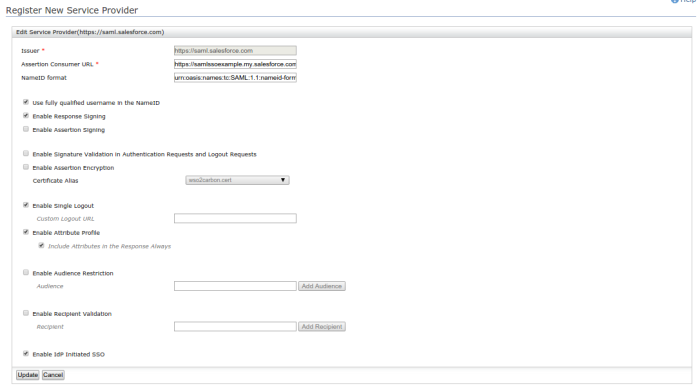
3. Enter travelocity.com in the Service Provider Name text box and click Register .

4. In the Inbound Authentication Configuration section, click Configure under the SAML2 Web SSO Configuration section.

3

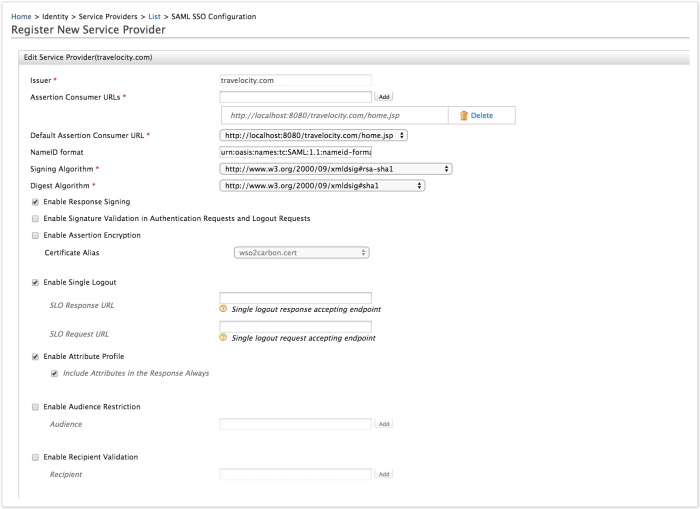
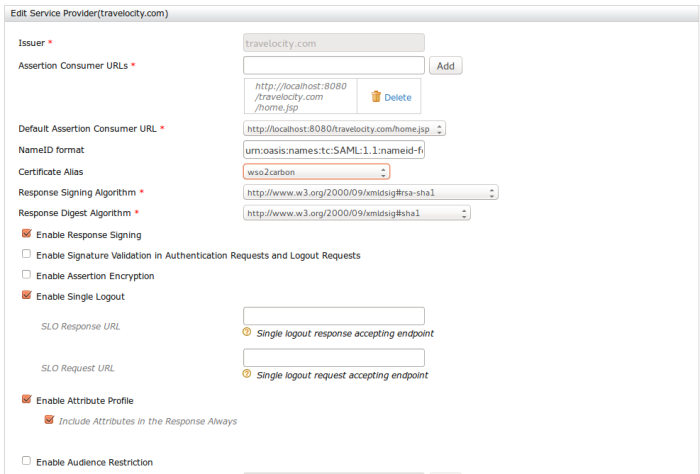
5. Now set the configuration as follows:

6. Select the following check-boxes:

  • Enable Response Signing
  • Enable Single Logout
  • Enable Attribute Profile
  • Include Attributes in the Response Always

7. Click Update to save the changes. Now you will be sent back to the Service Providers page.

8. Go to Claim configuration and select the mobile claim.

4

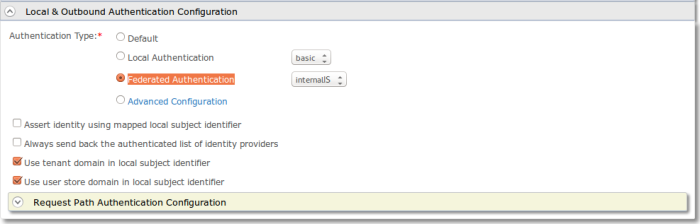
9. Go to Local and Outbound Authentication Configuration section.

10. Select the Advanced configuration radio button option

11. Add the basic authentication as first step and SMSOTP authentication as second step

5

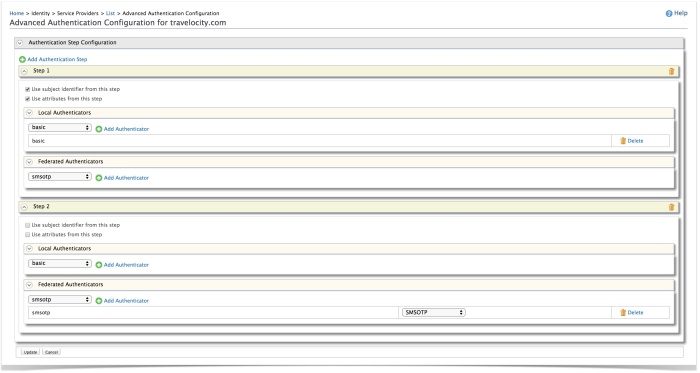
You have now added and configured the service provider.

Configuring User Claim

  1. Select Users and Roles in the IS Management Console
  2. Go to Users → admin →User Profile  and  update the mobile number. ( If nexmo is used, this number must be registered with nexmo in order to send sms).

Testing the sample

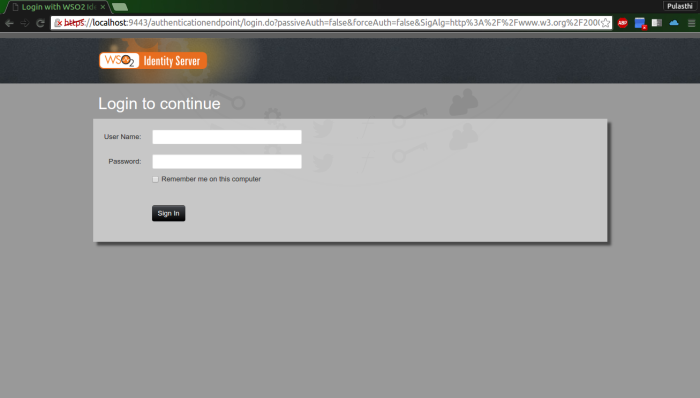
1. To  test the sample, go to the following URL: http://localhost:8080/travelocity.com 

2. Click the link to log in with SAML from WSO2 Identity Server.

3. Basic authentication page will be visible, use your IS username and password.

4. You will get a token to your mobile phone.Type the code to authenticate, You will be  taken to the home page of the travelocity.com app

Federated authentication between two Identity Servers

In this post I shall be explaining how federated authentication can be used to redirect the authentication of a user to another Identity Server.

Download the Identity Server from here, if you have not done so already. The installation guide can be found here.

Checkout the repository of the travelocity SSO sample from the link below, follow these instructions to checkout a folder.

https://github.com/wso2/product-is/tree/master/modules/samples/sso

In this tutorial we will be using two Identity Server instances namely an internal IS running on port 9443, and an external IS running on port 9445. Check this post if you need more information on how to run multiple Identity Servers on different ports. The travelocity sample will be deployed on tomcat. The travelocity webapp will redirect the login to the external IS, which again will redirect the authentication to the internal IS. The stepwise scenario is as follows.

  1. User visits the travelocity website and clicks to login through SAML SSO then the user is redirected to the external IS.
  2. The external IS redirects the authentication to the internal IS.
  3. The internal IS login screen is displayed and the user enters the credentials.
  4. The user credentials are checked against the LDAP of the internal IS.
  5. If authenticated, the user is redirected back to the external IS.
  6. The external IS redirects the user back to travelocity website as a logged in user.

dfdf

Step 1: Travelocity.properties

Go to the directory you saved the sample in and open src/main/resources/travelocity.properties. Check if the the configuration is as below and change the port of the IdPURL to 9445.

SAML2.SPEntityId=travelocity.com

SAML2.AssertionConsumerURL=http://localhost:8080/travelocity.com/home.jsp

SAML2.IdPEntityId=localhost

SAML2.IdPURL=https://localhost:9445/samlsso

Step 2: External IS Configuration

The external IS should have a new Identity Provider configured to federate the users to the internal IS. It should also have a service provider configured to identify the webapp.

  1. Add a new Identity Provider in the internal IS. Give a name and expand Federated Authenticators then SAML2 Web SSO Configuration. Do the configuration as follows. 

123.png

Save the configuration.

  1. Add a new Service Provider and click on Configure under Inbound Authentication Configuration -> SAML2 Web SSO Configuration then do the configuration as follows.

45Expand the Local & Outbound Authentication Configuration, then click on the  Federated Authentication radio button then select the identity provider you configured from the drop down.

6

Save the configuration.

Step 3: Internal IS Configuration

A new service provider needs to be configured in the Internal IS with the external IS as the Assertion Consumer URL.

Add a new Service Provider and click on Configure under Inbound Authentication Configuration -> SAML2 Web SSO Configuration then do the configuration as follows.

89

Save the configuration.

Step 4: Testing the authentication

Now if you add a user to the internal IS, you should be able to log in with the user even though you have configured the service provider in the external IS.

The basic HTTP header flow is as follows.

http://localhost:8080/travelocity.com 1. User visits travelocity webpage
http://localhost:8080/travelocity.com/samlsso?SAML2.HTTPBinding=HTTP-Redirect 2. User clicks on the login with SAML hyperlink
https://localhost:9445/samlsso?SAMLRequest=**** 3. User is directed to the external IS
https://localhost:9443/samlsso?SAMLRequest=**** 4. User is directed to the login page of the internal IS from the external IS
https://localhost:9443/samlsso 5. User logs in
https://localhost:9445/commonauth 6. Logged in user is redirected back to external IS
https://localhost:9445/samlsso?sessionDataKey=**** 7. User is given a session data key and is considered a logged in user

Hope this helps, this would prove useful in scenarios where the service provider has to be registered in one IS while the LDAP has been configured to another IS. Do drop a comment if you come across any issues :)

User Provisioning between two WSO2 Identity Servers

featured

In this post I shall be explaining how users can be provisioned between two different Identity Server instances.

User provisioning is a process which simplifies the creation and management of users on multiple systems. With user provisioning, when the user is added to the WSO2 LDAP, the system creates user accounts for the user on many different systems,. This eliminates the need for user accounts to be manually created in these systems. In this tutorial I will demonstrate how this functionality can be done between two WSO2 Identity Server instances. So ultimately when a user is added in one IS, the same user will be provisioned to the other.

Download the Identity Server from here, if you have not done so already. The installation guide can be found here.

In this example I shall be using two IS instances running locally on two different ports 9443 and 9445. If you need more information on how to change the running ports of WSO2 products, check my blog post on “Changing the Ports of WSO2 Servers

For the purposes of this tutorial, one IS shall be referred to as the Internal IS and the other as the External IS. The internal IS in this tutorial is running on port 9443 while the external IS is running on port 9445. Our ultimate objective is: when a user is added to the internal IS the same user shall be provisioned to the external IS.

Start the two Identity Servers and login to their management consoles and do the configurations as below.

Step 1: Configuring the Internal IS

  • Click on Add under Identity Providers on the left pane.
  • Give a name and expand the Outbound Provisioning Connectors and under that the SCIM Provisioning Configuration.
  • Check the Enable Checkbox and give the Username and Password of the External IS.
  • Give the user endpoint of the external IS, this is by default https://<HOST&gt;:<PORT>/wso2/scim/Users. (This value can also be found by expanding the Inbound Provisioning Configuration of the Resident Identity Provider in the External IS)
  • Give the User Store Domain as WSO2
  • Check the Enable User password provisioning to a SCIM domain checkbox.

1

  • Save the configuration
  • Click on List under Service Providers on the left pane then click on the Resident Service Provider link.
  • Expand Outbound Provisioning Configuration and select the Identity Provider you configured from the drop down menu then click on the plus icon.
  • Then update the configuration.

2

Step 2: Configuring the External IS

  • Click on List under Service Providers on the left pane then click on the Resident Service Provider link.
  • Expand the Inbound Provisioning Configuration and select the userstore domain to provision users to.
  • Then update the configuration

3

Step 3: Testing the provisioning

Now the configuration is complete. Hence when you add a user to the internal IS, the user should get provisioned to the external IS. I have added a user named testuser@wso2.com through the management console to the internal IS, the log entries of the internal and external Identity Servers are given below.

Internal IS

[2016-02-05 16:33:42,181]  INFO {org.wso2.carbon.identity.scim.common.impl.ProvisioningClient} –  SCIM – create user operation returned with response code: 201

External IS

[2016-02-05 16:33:42,092]  INFO {org.wso2.carbon.identity.scim.provider.impl.SCIMUserManager} –  User: PRIMARY/testuser@wso2.com is created through SCIM.

Now if you login to the external IS management console and navigate to List under Users and Roles, you will see that a user called testuser@wso2.com has been added.

Troubleshooting

Sometimes you may get the following error when adding a user to the internal IS.

ERROR {org.wso2.carbon.user.core.common.AbstractUserStoreManager} –  Error occurred while accessing Java Security Manager Privilege Block

This is caused as a result of the new Identity Provider configuration not being saved properly. In this case, first delete the identity provider entry from the Outbound Provisioning Configuration of the Resident Service Provider of the internal IS and Update it. Then delete the Identity Provider from the list of Identity Providers then follow step 1 again.

Hope this helps, do drop a comment if you come across any issues. Good Luck! :)

Changing the Ports of WSO2 Servers

Almost all of WSO2 products are by default configured to run on port 9443. You will run into many instances where you need to run multiple WSO2 products or multiple instances of the same product in the same environment. In these instances the operating ports of the servers need to be changed.

This can be done mainly in two ways:

Method 1: Setting the port in the carbon.xml

Open the <Product_Home>repository/conf/carbon.xml and change the value between the <Offset> tags. It is by default 0, if you change the value to 2, the server will run on port 9445.

Method 2: Passing the port offset during startup of the server

Running the following command with start the server on port 9445.

./wso2server.sh -DportOffset=2

In certain rare instances the port has been hard coded instead of being extracted from the carbon.xml. If you receive a “java.net.BindException”, the best possible way is to run the following command to see if it the port value has been hard coded anywhere and then change them accordingly where needed.

grep -ril “9443”

How the Travelocity Sample Works

If you’ve been following the Configuring Single Sign-On with SAML 2.0 on the WSO2 Identity Server Documentation, but can’t seem to figure out how SSO works on it, you’ve arrived at the right place. In this post I’ll be explaining my understanding of how the sample works. This might not be the most accurate description, so please feel free to drop a comment if I’ve mistaken something :)

You can checkout the sample from the SVN repository using the command given below.

svn co http://svn.wso2.org/repos/wso2/carbon/platform/branches/turing/products/is/5.0.0/modules/samples/sso/

The tree structure is given below,

12

Here the most important files for the purposes of this tutorial are, the java classes, the properties files, the web.xml and the home and index java servlet pages. The rest can be disregarded since they are not concerned with SSO.

To make this tutorial simple, we’ll be going through each of the components similar to the order in which they are referred in SAML2 based SSO. So once you have done the configuration based on the tutorial and the war file is deployed on tomcat, the first thing that happens when you visit http://localhost:8080/travelocity.com is that you will be directed to the index page.

Part 1: The index.jsp

Given below is the index page of the travelocity sample.

3

For this tutorial, we shall only be focused on “login with SAML from WSO2 Identity Server”. If you look at the source code of the index.jsp page, you will see that the hyperlink for the SAML Login is “samlsso

4

So when you click on the “here” hyperlink, you will get redirected to http://localhost:8080/travelocity.com/samlsso but in reality you get directed to the authentication page of the WSO2 Identity Server which is given below.

x

This is where the next component comes into play. So let’s look at the SSOFilter.

Part 2: The SSOFilter

A filter is a way of performing filtered functionality on a java web application. Typically filters are used to perform some piece of functionality either before or after the primary functionality of the web application. The architecture of the filter is given below.

5

How the filter is triggered will be discussed in the web.xml (Part 3).

In this scenario, the SSO functionality has been implemented in the form of a filter using the WSO2 library org.wso2.carbon.identity.sso.agent. When the filter is triggered, the request is sent through the SSOFilter. Here a SAML Assertion is generated and the browser is redirected to the WSO2 IS authentication page and once a user is authenticated, the SAML Response is again sent through the filter. During this process the SAML response is validated using the public and private key pair found in the wso2carbon.jks file. Once the user is validated, the browser is redirected to the home.jsp which is the Assertion Consumer URL.

Part 3: The web.xml

The web.xml is the deployment descriptor file of a java web application and is used to determine how URLs map to servlets, which URLs require authentication, and other information. It can be found inside the WEB-INF directory in the webapp folder.

In the web.xml of travelocity, the SSOFilter is defined.

6

Here the filter class name is given to locate the jar file from the libraries. The jar file was added as a dependency in the pom.xml.

The filter mapping is used to initialize the filter. When a particular url is requested, if it contains any of the url-patterns as given in the filter mapping, the particular filter is initiated. In this scenario, when the url http://localhost:8080/travelocity.com/samlsso is requested, since it contains the /samlsso url pattern, the SSOFilter is initiated.

Now once the request is sent through the SSOFilter and the SAML Response is validated, the user is then redirected to the Assertion Consumer URL. In this case the consumer url is http://localhost:8080/travelocity.com/home.jsp. So next let’s look at the home.jsp.

Part 4: The home.jsp

7

In this example, the default dashboard of the webapp is implemented within the consumer url itself, but in practical situations, the consumer url merely redirects the user to the particular dashboard of the logged in user.

Given below is the source of the home.jsp.

8

The first few lines of code in the home.jsp are there to retrieve the attributes from the response. the claimedID and openIDAttributes are irrelevant because we are only focused on SAML in this tutorial. The subject is the username of the logged in user. The samlSSOAttributes and accessTokenResponseBean are also saved if needed to be used. At any point if any of the if statements become false, that means that the user is not validated, and redirects the browser back to the index.jsp.

The rest of the home.jsp is HTML and is fairly irrelevant except for the part where it displays the username of the logged in user from the subjectID.

g

That concludes the SAML process but to fully understand the working of SSO, it’s important to know how the properties file is defined and how it is loaded.

Part 5: The travelocity.properties

The file is found inside the resources folder and this file contains all the information about SAML based SSO for the travelocity.com webapp. The file is loaded to the SSOAgentConfigs by the SampleContextEventListener.java, which will be discussed in the next part.

The information in the properties file such as the issuerID, the Assertion Consumer URL are used by the SSOFilter to identify the Service Provider in the WSO2 Identity Server. This also says if the response and assertion are signed or not, which needs to be configured in the IS.

Other information such as the Keystore Password are used to retrieve the public and private keys from the keystore wso2carbon.jks, to validate the saml response received by the filter.

It is important to understand that the properties file nor the keystore are used by the web application but rather are used by the SSOFilter.

Part 6: The SampleContextEventListener.java

So how does the SSOFilter know where to find the properties file and the keystore. This is where the SampleContextEventListener.java is used. The SampleContextEventListener is initialized as a listener in the web.xml as follows.

t

When the webapp is deployed, the SampleContextEventListener loads the properties file and the keystore to the SSOAgentConfigs in the org.wso2.carbon.identity.sso.agent library. From here it is again retrieved whenever needed.

So that’s a brief explanation as to how the travelocity.com sample works, there’s much more to it, specially the functioanlity of the SSOFilter. Hope I covered everything correctly, do drop a comment if I’ve missed anything.

Debugging a webapp deployed on WSO2 Application Server with Eclipse

Debugging a webapp deployed on the WSO2 Application Server can be tiresome at times. The best possible way to achieve this is by remote debugging. Remote debugging is used to debug an application running on a remote server through a local development environment. This is done by starting the application on debug mode then attaching the local development environment to the debug port of the application. This example uses Eclipse for the debugging but this can be done similarly with Intellij Idea as well.

Deploy the webapp on the WSO2 Application Server, then stop the server. In this example an Application Server running on localhost is used.

Step 1: Set up Debug Configurations

  1. Import the webapp into Eclipse.
  2. Place breakpoints where needed.
  3. In Eclipse, go to Run -> Debug Configurations. 
  4. Select Remote Java Application from the left pane then click on the New icon on top.
  5. Select the newly created Debug Configuration, then change the configuration as follows.
  6. Click on the Browse button then select the project that needs to be debugged.
  7. Input the Host and Port of the Application Server. Here we shall be using localhost and 8000 as the port.

The configuration is given below.

Screenshot from 2016-01-05 18-53-01

Step 2: Start the Application Server in Debug Mode

Navigate to <AS_home>/bin from the terminal then start the Application Server on debug mode with the following command.

./wso2server.sh –debug 8000

Here 8000 is the debug port and should be the same as the port given in the debug configuration in Eclipse.

When the server starts listening to the address, start debugging.

Do drop a comment if you have any issues. Have fun!


Integrating Salesforce with WSO2 Identity Server

This blog post focuses on enabling SAML 2 based Single Sign on for Salesforce, using the WSO2 Identity Server as the identity provider.

Prerequisites

WSO2 Identity Server

The WSO2 Identity Server download link and the installation guide are given below,

Step-by-Step Process

Step 1 : Configuring Salesforce
  1. Go to Salesforce and create an account.
  2. A domain name needs to be registered in order to redirect the login to WSO2 IS Authentication page. For this, login to salesforce with the newly created credentials and click on the Settings tab on the top right corner then select Setup Home.
  3. Expand the Company Settings tag from the left pane, then click on the My Domain link.
  4. Create a domain, for example samlssoexample.my.salesforce.com and deploy it. You will receive an email once the domain has been created.
  5. Expand the Identity tag from the left pane, then click on Single Sign-On Settings.
  6. Under Federated Single Sign-On Using SAML, click on the Edit button and tick the SAML Enabled Checkbox.
  7. Under SAML Single Sign-On Settings, click on the New Button, then fill out the details as below.
Name WSO2IS
API Name WSO2_IS
Issuer https://localhost:9443/samlsso [1]
Entity ID https://saml.salesforce.com
Identity Provider Certificate Download file from here [2]
Request Signing Certificate Default Certificate
Request Signature Method RSA-SHA1
Assertion Decryption Certificate Assertion not encrypted
SAML Identity Type Assertion contains User’s salesforce.com username
SAML Identity Location Identity is in the NameIdentifier element of the Subject statement
Service Provider Initiated HTTP POST
Identity Provider Login URL https://localhost:9443/samlsso
Identity Provider Logout URL https://localhost:9443/samlsso
User Provisioning Enabled Unchecked

[1] The issuer value should be equal to the entity value configured in the Identity Provider of the WSO2 Identity Server.

[2] The certificate file given corresponds to the default certificate used by the WSO2 IS. If a new certificate is used, an Idp with the certificate should be registered in the WSO2 IS.

The final configuration is given below.

config

8. Go back to the Domain Settings as in step 1.3

9. Under Authentication Configuration click on the Edit button then check the WSO2IS tick box and uncheck the Login Page checkbox.

10. Log out and close Salesforce.

Step 2 : Configuring WSO2 IS
  1. Start the WSO2 identity server and login to the server from https://localhost:9443/carbon/admin/login.jsp .
  2. Under Service Providers, click on Add and give a name and then Register.
  3. Then expand the Inbound Authentication Configuration under that expand SAML2 Web SSO Configuration then click on Configure.
  4. Give the configurations as below.
Issuer https://saml.salesforce.com
Assertion Consumer URL Check below
Use fully qualified username in the NameID Check
Enable Response Signing Check
Enable Attribute Profile Check
Include Attributes in the Response Always Check
Enable IdP Initiated SSO Check

Leave the rest as default.

The Assertion Consumer URL can be found from the Single Sign-On Settings in Salesforce. Navigate to the SSO settings as shown in step 1.5 then click on WSO2IS. On the bottom of the page is an attribute called Salesforce Login URL. This URL is used as the Assertion Consumer URL.  

Then register the service provider.

The Final Configuration is given below.

IS

5. To check the authentication, a user with the same credentials used to create the Salesforce account is needed in the Identity Server. For this, Click on Configure on the left-most pane of the Identity Server Management Console, then click on Users and Roles from the left pane. Click on Users, then Add a new user, using the same credentials used for the Salesforce account.

Step 3 : Use SSO

Start the WSO2 Identity Server then goto the newly registered domain name url. The page should be redirected to the WSO2 Identity Server authentication page. If the configurations are correct,  when the credentials are given the page should be redirected to the dashboard of the logged in user.