This blog post focuses on enabling SAML 2 based Single Sign on for Salesforce, using the WSO2 Identity Server as the identity provider.
Prerequisites
WSO2 Identity Server
The WSO2 Identity Server download link and the installation guide are given below,
Step-by-Step Process
Step 1 : Configuring Salesforce
- Go to Salesforce and create an account.
- A domain name needs to be registered in order to redirect the login to WSO2 IS Authentication page. For this, login to salesforce with the newly created credentials and click on the Settings tab on the top right corner then select Setup Home.
- Expand the Company Settings tag from the left pane, then click on the My Domain link.
- Create a domain, for example samlssoexample.my.salesforce.com and deploy it. You will receive an email once the domain has been created.
- Expand the Identity tag from the left pane, then click on Single Sign-On Settings.
- Under Federated Single Sign-On Using SAML, click on the Edit button and tick the SAML Enabled Checkbox.
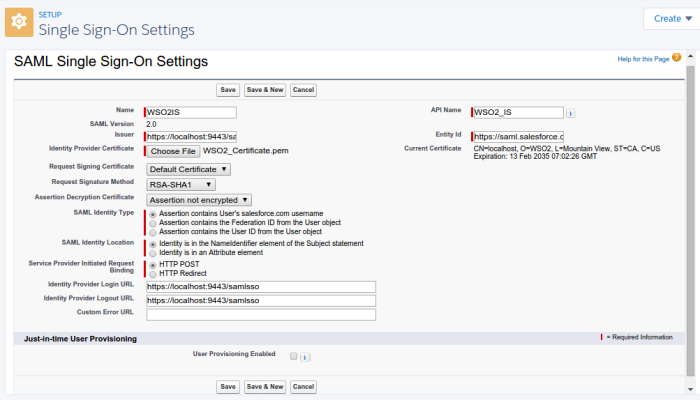
- Under SAML Single Sign-On Settings, click on the New Button, then fill out the details as below.
| Name | WSO2IS |
| API Name | WSO2_IS |
| Issuer | https://localhost:9443/samlsso [1] |
| Entity ID | https://saml.salesforce.com |
| Identity Provider Certificate | Download file from here [2] |
| Request Signing Certificate | Default Certificate |
| Request Signature Method | RSA-SHA1 |
| Assertion Decryption Certificate | Assertion not encrypted |
| SAML Identity Type | Assertion contains User’s salesforce.com username |
| SAML Identity Location | Identity is in the NameIdentifier element of the Subject statement |
| Service Provider Initiated | HTTP POST |
| Identity Provider Login URL | https://localhost:9443/samlsso |
| Identity Provider Logout URL | https://localhost:9443/samlsso |
| User Provisioning Enabled | Unchecked |
[1] The issuer value should be equal to the entity value configured in the Identity Provider of the WSO2 Identity Server.
[2] The certificate file given corresponds to the default certificate used by the WSO2 IS. If a new certificate is used, an Idp with the certificate should be registered in the WSO2 IS.
The final configuration is given below.
8. Go back to the Domain Settings as in step 1.3
9. Under Authentication Configuration click on the Edit button then check the WSO2IS tick box and uncheck the Login Page checkbox.
10. Log out and close Salesforce.
Step 2 : Configuring WSO2 IS
- Start the WSO2 identity server and login to the server from https://localhost:9443/carbon/admin/login.jsp .
- Under Service Providers, click on Add and give a name and then Register.
- Then expand the Inbound Authentication Configuration under that expand SAML2 Web SSO Configuration then click on Configure.
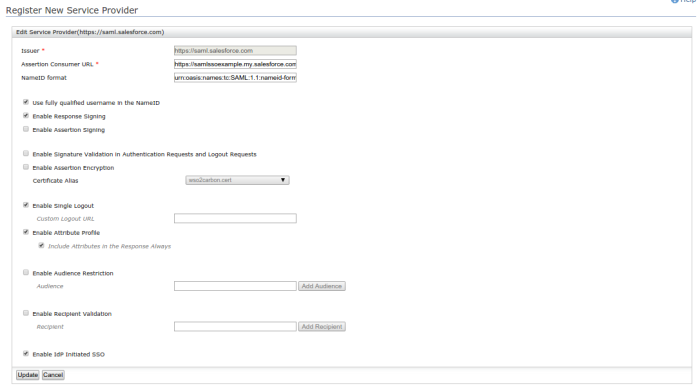
- Give the configurations as below.
| Issuer | https://saml.salesforce.com |
| Assertion Consumer URL | Check below |
| Use fully qualified username in the NameID | Check |
| Enable Response Signing | Check |
| Enable Response Signing | Check |
| Enable Attribute Profile | Check |
| Include Attributes in the Response Always | Check |
| Enable IdP Initiated SSO | Check |
Leave the rest as default.
The Assertion Consumer URL can be found from the Single Sign-On Settings in Salesforce. Navigate to the SSO settings as shown in step 1.5 then click on WSO2IS. On the bottom of the page is an attribute called Salesforce Login URL. This URL is used as the Assertion Consumer URL.
Then register the service provider.
The Final Configuration is given below.
5. To check the authentication, a user with the same credentials used to create the Salesforce account is needed in the Identity Server. For this, Click on Configure on the left-most pane of the Identity Server Management Console, then click on Users and Roles from the left pane. Click on Users, then Add a new user, using the same credentials used for the Salesforce account.
Step 3 : Use SSO
Start the WSO2 Identity Server then goto the newly registered domain name url. The page should be redirected to the WSO2 Identity Server authentication page. If the configurations are correct, when the credentials are given the page should be redirected to the dashboard of the logged in user.
