Integrating Drupal with WSO2 Identity Server

This tutorial will focus on setting up SAML 2 based Single Sign On for Drupal using the WSO2 Identity Server as the Identity Provider. Here we will be using an Apache2 webserver with PHP5 support and MySQL support for deployment purposes. This tutorial uses Ubuntu 15.10 operating system for deployment and testing.

Prerequisites

WSO2 Identity Server
The WSO2 Identity Server download link and the installation guide are given below,

Step-by-Step Process

Step 1: Configuring the prerequisites
  1. Install MySQL. Type the following command on the terminal with root access.

sudo apt-get install mysql-server mysql-client

You will be asked to set a root password for the MySQL root user. This password will be used in future for root@localhost.

  1. Install Apache2. Apache2 is sometimes installed by default in some ubuntu version. Either way run the following command to install or update it.

sudo apt-get install apache2

  1. Now go to http://localhost in your browser, if the installation was successful, you will be redirected to the apache2 default page.
  2. Install PHP5. Both PHP5 and Apache PHP module need to be installed. Run the following command to install them.

sudo apt-get install php5 libapache2-mod-php5

  1. Install MySQL support for PHP5.

sudo apt-get install php5-mysql

  1. Install the following php extensions using the following command. These are required for the SimpleSAMLphp Service Provider.

sudo apt-get install php5-cli php5-common php5-curl php-pear php5-mcrypt php5-json

  1. Install phpMyAdmin. phpMYAdmin is a web interface used to manage sql databases.

sudo apt-get install phpmyadmin

  1. Restart Apache using the following command then goto http://localhost/phpmyadmin to access phpmyadmin.

sudo service apache2 restart

IMPORTANT: For deployment purposes on a local server, an SSL Certificate has to be created for Apache2. This enables the web applications hosted on apache2 to be certified by SSL. Unless this is done the SimpleSAML module used, will throw an error. A separate doc is available on how to Create an SSL certificate for localhost….

Step 2: Setting up Drupal
  1. Download your preferred version of drupal from here.
  2. Extract the downloaded archive and copy the contents to /var/www/html/ using the following command. Here I have downloaded the version Drupal-6.37

sudo cp -r drupal-6.37 /var/www/html/

  1. Visit https://localhost/drupal-6.37/ on a web browser, if the deployment was successful, it should show the installation page of Drupal. Leave this for now and continue with the rest of the steps.
  2. Go to https://phpmyadmin/ and select the Databases tab then add a new database called drupaldb. Then click on the Check Privileges link next to the database then ensure that root user has Global Privileges by editing his privileges.
  3. Next we need to mark settings file of Drupal as writable for the initialization. Run the following commands to do this. You would need root access to do this, so run the command sudo su then enter the root password.

cd /var/www/html/drupal-6.37/sites/default

mkdir files

cp default.settings.php settings.php

chmod -R a+w .

  1. Add the following two lines to settings.php
ini_set('mbstring.http_input', 'pass');  
ini_set('mbstring.http_output', 'pass');  


  1. Go back to the Drupal installation page and use the following information to setup the databases.
Database Name drupaldb
Database username root
Database Password <your database root password>

NOTE: This password is the password that you set when installing MySQL and not your OS root password

  1. Once the configuration is complete, remove the write permissions from the ones changed in step 2.6 by running the following commands as a root user

cd /var/www/html/drupal-6.37/sites/default

chmod -R a-w .

  1. Finish the drupal installation, use the following information when asked.
Site name localhost
Username admin@wso2.com
E-mail address admin@wso2.com
Password admin
  1. Once the installation is complete, log out of drupal then log in again using the username admin@wso2.com and password admin
Step 3: Setting up SimpleSAMLPHP
  1. Run the following commands as a root user.

cd /var

mkdir simplesamlphp

cd simplesamlphp

wget http://simplesamlphp.googlecode.com/files/simplesamlphp-1.11.0.tar.gz

tar xvf simplesamlphp-1.11.0.tar.gz

mv simplesamlphp-1.11.0 simplesamlphp

cd simplesamlphp

cp -r metadata-templates/*.php metadata/

cp -r config-templates/*.php config

  1. Configure simpleSAMLphp web in Apache

cd /var/www/html

ln -s /var/simplesamlphp/simplesamlphp/www simplesaml

  1. Start apache using the following command

sudo service apache2 start

  1. If you are able to access the simpleSAMLphp web page using https://localhost/simplesaml, then the installation was successful.
  2. Change the SimpleSAML admin credentials.

cd /var/simplesamlphp/simplesamlphp  

vi config/config.php

Change the value of auth.adminpassword from 123 to admin.

  1. Go back to https://localhost/simplesaml and click on Login as administrator link then login using the admin credentials.
  2. Next we need to add a service provider to SimpleSAMLphp. Run the following commands to open the authsources.php file

cd /var/simplesamlphp/simplesamlphp  

vi config/authsources.php

  1. Comment out the default-sp configuration and add the following configuration to the file.
'wso2-sp' => array(
        'saml:SP',
        // The entity ID of this SP.
        // Can be NULL/unset, in which case an entity ID is generated based on the metadata URL.
        'entityID' => 'simplesaml',
 
        // The entity ID of the IdP this should SP should contact.
        // Can be NULL/unset, in which case the user will be shown a list of available IdPs.
        'idp' => 'https://localhost:9443/samlsso',
 
        // The URL to the discovery service.
        // Can be NULL/unset, in which case a builtin discovery service will be used.
        'discoURL' => NULL
 
),
  1. We have to change the identity provider metadata in SimpleSAML. Open the file using the following command.

cd /var/simplesamlphp/simplesamlphp  

vi metadata/saml20-idp-remote.php

  1. Remove the existing idp from the file and add the following details.


$metadata['https://localhost:9443/samlsso'] = array(
   'name' => array(
     'en' => 'WSO2 IS',
     'no' => 'WSO2 IS',
   ),
   'description'        => 'Login with WSO2 IS SAML2 IdP.',
 
   'SingleSignOnService'  => 'https://localhost:9443/samlsso',
   'SingleLogoutService'  => 'https://localhost:9443/samlsso',
   'certFingerprint'    => '6bf8e136eb36d4a56ea05c7ae4b9a45b63bf975d'
);

NOTE: The certFingerprint used here is the thumbprint of the default certificate used by WSO2 IS. The SAML response is signed with this certificate.

More information on this step can be obtained from here.  

Step 4: Setting up the WSO2 IS
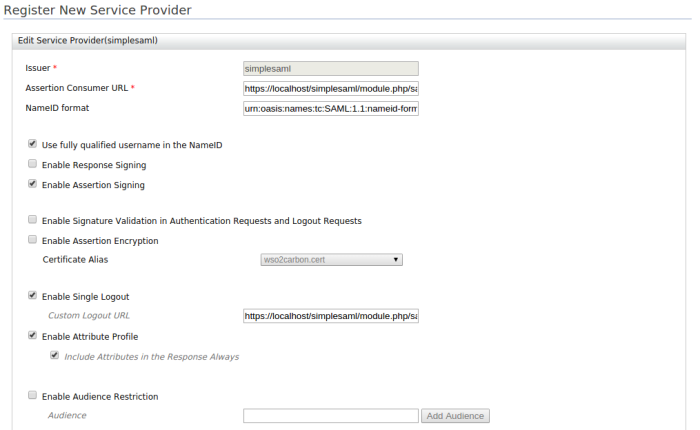
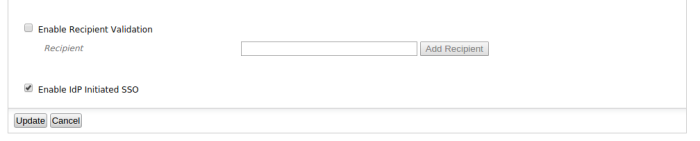
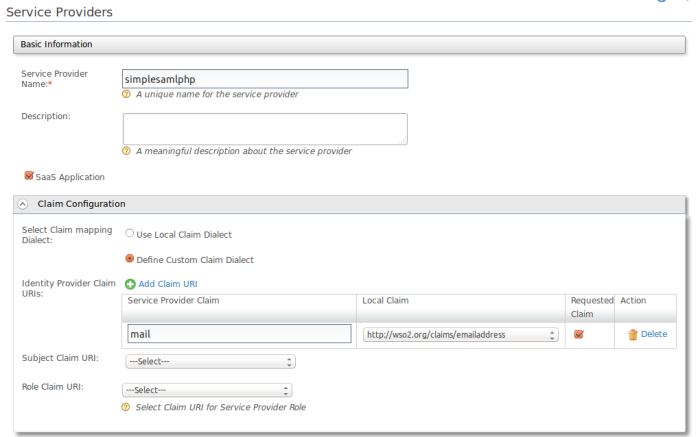
  1. Start the WSO2 Identity Server and add a service provider. Give a name and check the Saas Application checkbox.
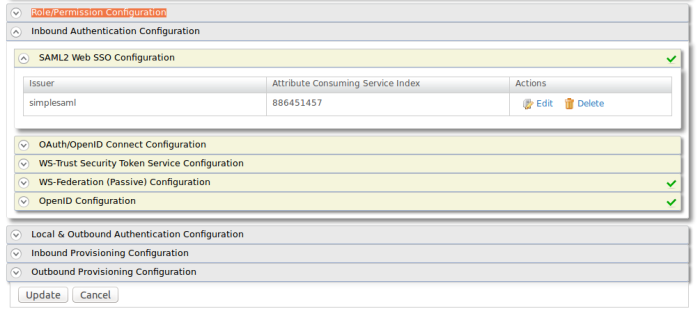
  2. Select Inbound Authentication Configuration, then SAML2 WEB SSO Configuration. Then click on configure and provide the following details.
Issuer simplesaml
Assertion Consumer URL https://localhost/simplesaml/module.php/saml/sp/saml2-acs.php/wso2-sp
Enable Assertion Signing True
Enable Single Logout True
Logout URL https://localhost/simplesamlphp/www/module.php/saml/sp/saml2-logout.php/wso2-sp
Enable Idp Initiates SSO True

Keep the rest as default values.

12

  1. Under Claim Configurations, select Define Custom Claim Dialect then add an Identity Provider Claim URI with the following information.
Service Provider Claim mail
Local Claim http://wso2.org/claims/emailaddress
Requested Claim True

The final configuration should look like this.

3.png4.png

  1. Now Go to https://localhost/simplesaml and click the Authentication tab and click on Test configured authentication sources. Pick wso2-sp and you will be redirected to the WSO2 IS Authentication Page, which means that the configuration was successful.
Step 5: Connecting Drupal with SimpleSAMLphp

1.Download the relevent simpleSAMLphp Authentication module from here.

  1. Create the following directory path and extract the downloaded archive into it.

cd /var/www/html/drupal-6.37/sites/all/modules

mkdir contrib

  1. Go to https://localhost/drupal-6.37/ and login to Drupal with admin credentials then nativate to Administer -> Site Building -> Modules. Then enable the SimpleSAMLphp Authentication which will be found under the other category.
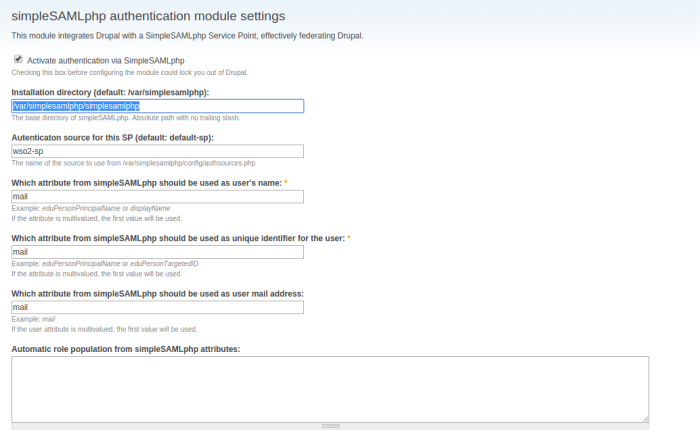
  1. Click on the Administration by module link then under simpleSAMLphp authentication click on simpleSAMLphp authentication module settings

Select “Activate authentication via SimpleSAMLphp”.

Installation directory (default: /var/simplesamlphp) /var/simplesamlphp/simplesamlphp
Autenticaton source for this SP (default: default-sp) wso2-sp
Which attribute from simpleSAMLphp should be used as user’s name mail
Which attribute from simpleSAMLphp should be used as unique identifier for the user mail
Which attribute from simpleSAMLphp should be used as user mail address mail

The final configuration should look as below.

d1.pngd2.png
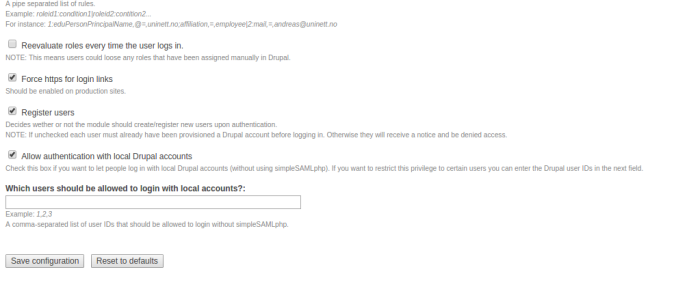
Then Save configuration.

  1. Go to phpmyadmin and create a database named, “SimpleSAMLphpDB” with username/password as root/<your password>.

6. Add the following lines to /var/simplesamlphp/simplesamlphp/config/config.php

'store.type' => 'sql',
'store.sql.dsn' => 'mysql:host=localhost;dbname=SimpleSAMLphpDB',
'store.sql.username' => 'root',
'store.sql.password' => 'root',
'store.sql.prefix' => '',
  1. Add the following entry to the /var/www/html/drupal-6.37/sites/default/settings.php
$databases['SimpleSAMLphpDB']['default'] = array(
  'driver' => 'mysql',
  'database' => 'SimpleSAMLphpDB',
  'username' => 'root',
  'password' => 'root',
  'host' => 'localhost',
  'prefix' => '',
);
  1. Restart the apache server.
Step 6: Use SSO

Go to  https://localhost/drupal-6.37 then click on the Federated Log In link then you will be redirected to the WSO2 IS authentication page. You can login using WSO2 credentials and you will be redirected back to the Drupal Dashboard.

Integrating Atlassian JIRA with WSO2 Identity Server

This post is on how you can configure SAML 2 based SSO for Atlassian JIRA, using the WSO2 Identity Server as the Identity Provider. Note that this configuration is very similar to the configuration for Confluence, which can be found here, since both Confluence and JIRA are products of Atlassian.

Prerequisites

WSO2 Identity Server

The WSO2 Identity Server download link and the installation guide are given below,

Atlassian JIRA

The JIRA download link and installation guide and given below. This tutorials has been tested with the JIRA Version 6.4, slight modifications might be required for other versions.

LastPass JIRA SAML Plugin

The plugin is required to configure SAML 2.0 SSO for JIRA. The download link is given below and the installation guide can be found in the file named INSTALL in the main folder.

IMPORTANT: Step 1 should be completed before the plugin installation as the plugin installation disables the default user login process which makes it difficult to do configurations inside the JIRA dashboard.

Step-by-Step Process

Step 1: Configuring JIRA LDAP

This step requires a working knowledge on LDAP, follow this link if you are unfamiliar with the concept.

JIRA by default uses an internal LDAP to keep track of the users and permissions. In order to integrate the WSO2 IS with JIRA, both LDAPs should point to the same LDAP instance. Here we are configuring the JIRA LDAP instance to point to the WSO2 IS LDAP.

  1. Once inside the JIRA dashboard, click on the cog icon, on the top pane and select User Management.
  2. Click on the User Directories link on the left-hand pane.
  3. Select Add Directory then select LDAP from the drop down menu.
  4. The configuration is given below

1 2 3 4 5

Test the configuration while having the WSO2 IS running. Then save.

NOTES

  • This configuration was done after configuring the WSO2 IS to accept email authentication. The configuration would slightly change unless this is done. See here for more information.
  • WSO2 IS by default uses port 10389 for the LDAP, this can be changed by changing the  <IS_HOME>/repository/conf/user-mgt.xml file. 
Step 2: Configuring JIRA
  1. Stop JIRA and install the LastPass plugin.
  2. Change the name of idp-metadata.xml.sample to idp-metadata.xml and sp-metadata.xml.sample to sp-metadata.xml. These two files are found in your <JIRA_HOME> directory.
  3. Change the <JIRA_HOME>/idp-metadata.xml as follows
  • Change the entityID value to the issuer name you will be configuring the Service Provider in your IdP with. For this tutorial we will be setting this as “LastPass-JIRA”.
  • Replace the <md:SingleSignOnService….> tag with
<md:SingleSignOnService
Binding="urn:oasis:names:tc:SAML:2.0:bindings:HTTP-Redirect"
Location="https://localhost:9443/samlsso"/>
  • Add this after the replacement
<md:SingleSignOnService
Binding="urn:oasis:names:tc:SAML:2.0:
bindings:HTTP-POST" 
Location="https://localhost:9443/samlsso"/>
  • Replace the <md:SingleLogoutService….> tag with
<md:SingleLogoutService 
Binding="urn:oasis:names:tc:SAML:2.0:
bindings:HTTP-Redirect" 
Location="https://localhost:9443/samlsso" 
ResponseLocation="https://localhost:9443/samlsso"/>
  • Replace the “cert-goes-here” between the <ds:X509Certificate> tags with your certificate. WSO2 IS default certificate can be found here.

(Use without the –BEGIN– and –ENG– tags)

NOTE: The edited idp-metadata.xml file should look like this.

  4. Change the <JIRA_HOME>/sp-metadata.xml as follows

  • Change the entityID to the issuer value as above, in this case to “LastPass-JIRA”.
  • Replace “http://jira.example.com ” with your JIRA URL, in this case that is “http://localhost:PORT ” .  Replace PORT with the port JIRA is running on, by default it is 8080. I have configured JIRA with port 8070.

NOTE: The edited sp-metadata.xml file should look like this.

5. Add the following line after initializing “originalURL” in <JIRA_HOME>/atlassian-jira/saml_acs.jsp

originalUrl = “/secure/Dashboard.jspa“;

Step 3: Configuring WSO2 IS
  1. Select Add under the Service Provider section on the left pane.
  2. Give a name and register the Service Provider.
  3. Click on “Inbound Authentication Configuration” under that click on “SAML Web SSO Configuration”. Then click on “Configure”
  4. Give the following values
    • Issuer = LastPass-JIRA (The value has to equal the value we gave for issuer in Step 2)
    • Assertion Consumer URL = http://localhost:8070/saml_acs.jsp
    • Check “Use fully qualified username in the NameID”
    • Check “Enable Response Signing
    • Check “Enable Assertion Signing”
    • Check “Enable Single Logout
  5. Click Register then update.
Step 4: Patch the WSO2 IS

The Identity Server needs to be patched to include an attribute of the authentication statement. This is an optional attribute according to the SAML Specification, so the IS does not set it. The plugin searches for this attribute and throws an error if it is unavailable.

Add the following line in the buildSAMLAssertion() method after initializing the authStmt in this class,

authStmt.setSessionNotOnOrAfter(notOnOrAfter);

Step 5: Run the Server

Now we are all set, run JIRA and the WSO2 IS. The JIRA default url should redirect you to the WSO2 IS authentication page. When you enter the credentials, you will be redirected to the JIRA Dashboard of the logged in user.

Troubleshooting


Hope this helps, do drop a comment if there’s any thing you need clarified. Have fun!

Integrating Atlassian Confluence with WSO2 Identity Server

The next series of posts will focus on how SAML 2.0 based SSO can be configured for specific third party applications using the WSO2 Identity Server as the IdP. Once all the configurations are complete, the user will have the ability to use any of these applications, having been authenticated once by the WSO2 Identity Server.

This post is on how SAML 2 based Single Sign On can  be configured for Atlassian Confluence using the WSO2 Identity Server as the Identity Provider.

Prerequisites

WSO2 Identity Server

The WSO2 Identity Server download link and the installation guide are given below,

Atlassian Confluence

The Confluence download link and installation guide and given below. This tutorials has been tested with the Confluence Version 5.7.1, slight modifications might be required for other versions.

LastPass Confluence SAML Plugin

The plugin is required to configure SAML 2.0 SSO for confluence. The download link is given below and the installation guide can be found in the file named INSTALL in the main folder.

IMPORTANT: Step 1 should be completed before the plugin installation as the plugin installation disables the default user login process which makes it difficult to do configurations inside the confluence dashboard.

Step-by-Step Process

Step 1: Configuring Confluence LDAP

This step requires a working knowledge on LDAP, follow this link if you are unfamiliar with the concept.

Confluence by default uses an internal LDAP to keep track of the users and permissions. In order to integrate the WSO2 IS with Confluence, both LDAPs should point to the same LDAP instance. Here we are configuring the confluence LDAP instance to point to the WSO2 IS LDAP.

  1. Once inside the confluence dashboard, click on the cog icon, on the top pane and select User Management.
  2. Click on the User Directories link on the left-hand pane.
  3. Select Add Directory then select LDAP from the drop down menu.
  4. The configuration is given below

1

2 3 45


Test the configuration while having the WSO2 IS running. Then save.

NOTES

  • This configuration was done after configuring the WSO2 IS to accept email authentication. The configuration would slightly change unless this is done. See here for more information.
  • WSO2 IS by default uses port 10389 for the LDAP, this can be changed by changing the  <IS_HOME>/repository/conf/user-mgt.xml file. 
Step 2: Configuring Confluence
  1. Stop Confluence and install the LastPass plugin.
  2. Change the name of idp-metadata.xml.sample to idp-metadata.xml and sp-metadata.xml.sample to sp-metadata.xml. These two files are found in your <CONFLUENCE_HOME> directory.
  3. Change the <CONFLUENCE_HOME>/idp-metadata.xml as follows
  • Change the entityID value to the issuer name you will be configuring the Service Provider in your IdP with. For this tutorial we will be setting this as “LastPass-Confluence”.
  • Replace the <md:SingleSignOnService….> tag with
<md:SingleSignOnService Binding=“urn:oasis:names:tc:SAML:2.0:bindings:HTTP-Redirect” Location=“https://localhost:9443/samlsso>
  • Replace the <md:SingleLogoutService….> tag with
<md:SingleLogoutService Binding="urn:oasis:names:tc:SAML:2.0:bindings:HTTP-Redirect" Location="https://localhost:9443/samlsso"/>
  • Replace the “cert-goes-here” between the <ds:X509Certificate> tags with your certificate. WSO2 IS default certificate can be found here.

(Use without the –BEGIN– and –ENG– tags)

NOTE: The edited idp-metadata.xml file should look like this.

    4. Change the <CONFLUENCE_HOME>/sp-metadata.xml as follows

  • Change the entityID to the issuer value as above, in this case to “LastPass-Confluence”.
  • Replace “http://confluence.example.com ” with your confluence URL, in this case that is “http://localhost:PORT ” .  Replace PORT with the port confluence is running on, by default it is 8090.

NOTE: The edited sp-metadata.xml file should look like this.

Step 3: Configuring WSO2 IS
  1. Select Add under the Service Provider section on the left pane.
  2. Give a name and register the Service Provider.
  3. Click on “Inbound Authentication Configuration” under that click on “SAML Web SSO Configuration”. Then click on “Configure”
  4. Give the following values
    • Issuer = LastPass-Confluence (The value has to equal the value we gave for issuer in Step 2)
    • Assertion Consumer URL = http://localhost:8090/saml_acs.jsp
    • Check “Use fully qualified username in the NameID”
    • Check “Enable Response Signing
    • Check “Enable Assertion Signing”
    • Check “Enable Single Logout
  5. Click Register then update.
Step 4: Patch the WSO2 IS

The Identity Server needs to be patched to include an attribute of the authentication statement. This is an optional attribute according to the SAML Specification, so the IS does not set it. The plugin searches for this attribute and throws an error if it is unavailable.

Add the following line in the buildSAMLAssertion() method after initializing the authStmt in this class,

authStmt.setSessionNotOnOrAfter(notOnOrAfter);

Step 5: Run the Server

Now we are all set, run Confluence and the WSO2 IS. The Confluence default url should redirect you to the WSO2 IS authentication page. When you enter the credentials, you will be redirected to the Confluence Dashboard of the logged in user.

Do drop a comment if you have any problems. Have fun! :)

SAML 2.0 based Single Sign On

Hi there!

If you are looking for documentation and information on implementing a SAML 2.0 based Single Sign On (SSO) system, and can’t seem to find much online references, you’ve arrived at the correct place. In the next few posts we’ll be discussing everything you need to know about implementing a SAML 2.0 based SSO systen.

Before we get started, we need to first understand what SSO and SAML are, and how they work

Single Sign On

Introduction

Single Sign On (SSO) is an access control property for multiple independent software systems.  Is is a user authentication process that permits a user to enter a single username and password and be given access to an array of multiple applications. The SSO system authenticates the particular user for all the applications and services that he has been given the right to access, which eliminates the need for further authentication when accessing these applications or services.

“Single sign-on (SSO) is mechanism whereby a single action of user authentication and authorization can permit a user to access all computers and systems where he has access permission, without the need to enter multiple passwords. Single sign-on reduces human error, a major component of systems failure and is therefore highly desirable but difficult to implement”

-The Open Group-

SSO is typically “difficult to implement” due to different applications and services, supporting different authentication mechanisms. Thus the SSO mechanism implanted, should have the ability to translate the credentials used for initial authentication, to be used to access the other applications and services.

Conversely, Single Single Sign Off or Single Log-out is the process where a single logging out, terminates the access to multiple applications and services.

Configurations
Kerberos

Kerberos is an authentication mechanism which uses tickets to access different applications and services. The initial  authentication at the Authentication Server (AS), grants the user an encrypted Ticket Granting Ticket (TGT). When the client needs to access a particular service, the clients sends the TGT to the Ticket Granting Service (TGS) which verifies the validity of the ticket and issues a session key to the client to access the requested service.

Smart Cards

Smart cards are a hardware token. At initial authentication the user credentials are stored in the card which negates the need for the user to be authenticated every time the user access an application or a service. Provided that the user holds the smart card, the user is given access to these services.

Security Assertion Markup Language (SAML)

SAML is an XML standard. It is the most reliable and easy-to-implement SSO configuration, making it the most commonly used. It is mostly designed for business to business and business to consumer transactions. We’ll be talking more about SAML in the next post.

Benefits

The most common benefit is that SSO reduces the need for a user to remember different username-password combinations, thus improving the user experience. This in-turn reduces the possibility of errors and thereby increases productivity.

Drawbacks

The main drawback lies with the possibility of the username and password falling into the wrong hands. Unlike in a system that is not implemented with SSO, the damaged caused could be catastrophic. Thus the need for increased security and protection in an SSO implemented system is identified.

Security Assertion Markup Language (SAML)

SAML is an XML based protocol that is used in exchanging authentication and authorization data between domains with the use of tokens. SAML was produced by the OASIS Security Services Technical Committee in 2001. The latest version of SAML is SAML 2.0 which was accepted as an OASIS standard in 2005. SAML 2.0 is the key configuration used in SSO thus the focus of this discussion will be on SAML 2.0.

The working of SAML 2.0 SSO is given below.

0253642001447922228_saml_0


Once the process is complete, the Service Provider grants the user access to the service, based on the permissions defined in the service providers user database.

Where there are multiple service providers, SSO enables the client to use the same SAML token granted from the IdP, to access all the services. Thus the user need only be authenticated once by the IdP and thereafter given access to all the service providers.