In this post I shall be explaining how federated authentication can be used to redirect the authentication of a user to another Identity Server.
Download the Identity Server from here, if you have not done so already. The installation guide can be found here.
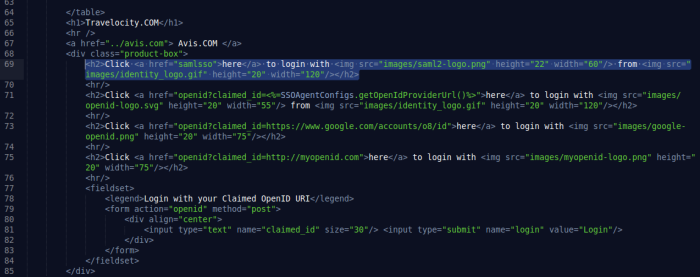
Checkout the repository of the travelocity SSO sample from the link below, follow these instructions to checkout a folder.
https://github.com/wso2/product-is/tree/master/modules/samples/sso
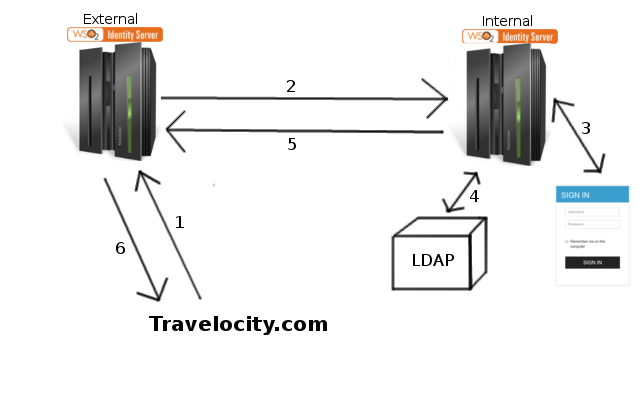
In this tutorial we will be using two Identity Server instances namely an internal IS running on port 9443, and an external IS running on port 9445. Check this post if you need more information on how to run multiple Identity Servers on different ports. The travelocity sample will be deployed on tomcat. The travelocity webapp will redirect the login to the external IS, which again will redirect the authentication to the internal IS. The stepwise scenario is as follows.
- User visits the travelocity website and clicks to login through SAML SSO then the user is redirected to the external IS.
- The external IS redirects the authentication to the internal IS.
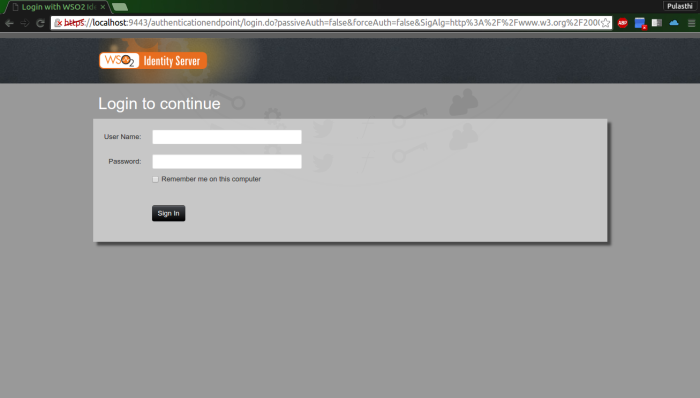
- The internal IS login screen is displayed and the user enters the credentials.
- The user credentials are checked against the LDAP of the internal IS.
- If authenticated, the user is redirected back to the external IS.
- The external IS redirects the user back to travelocity website as a logged in user.
Step 1: Travelocity.properties
Go to the directory you saved the sample in and open src/main/resources/travelocity.properties. Check if the the configuration is as below and change the port of the IdPURL to 9445.
SAML2.SPEntityId=travelocity.com
SAML2.AssertionConsumerURL=http://localhost:8080/travelocity.com/home.jsp
SAML2.IdPEntityId=localhost
SAML2.IdPURL=https://localhost:9445/samlsso
Step 2: External IS Configuration
The external IS should have a new Identity Provider configured to federate the users to the internal IS. It should also have a service provider configured to identify the webapp.
- Add a new Identity Provider in the internal IS. Give a name and expand Federated Authenticators then SAML2 Web SSO Configuration. Do the configuration as follows.
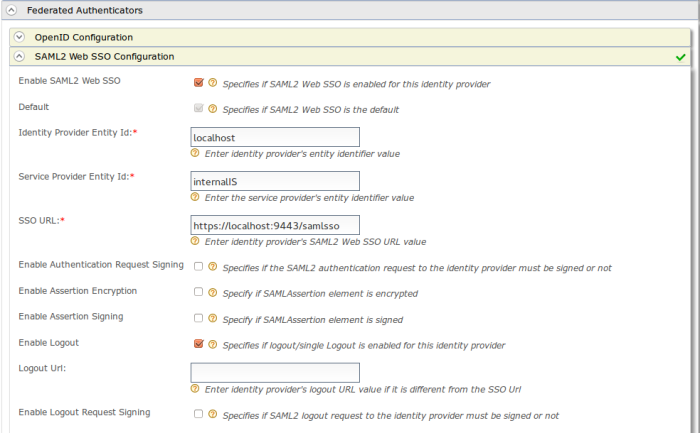
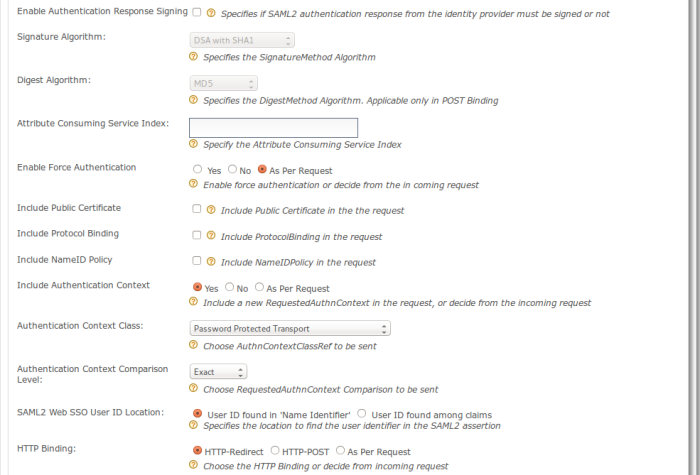
Save the configuration.
- Add a new Service Provider and click on Configure under Inbound Authentication Configuration -> SAML2 Web SSO Configuration then do the configuration as follows.
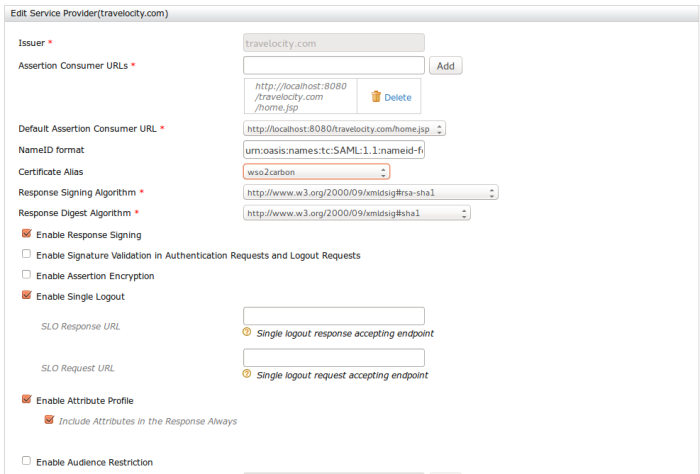
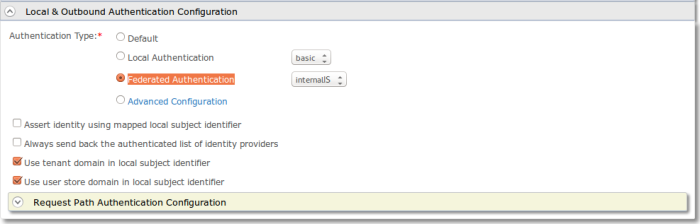
 Expand the Local & Outbound Authentication Configuration, then click on the Federated Authentication radio button then select the identity provider you configured from the drop down.
Save the configuration.
Step 3: Internal IS Configuration
A new service provider needs to be configured in the Internal IS with the external IS as the Assertion Consumer URL.
Add a new Service Provider and click on Configure under Inbound Authentication Configuration -> SAML2 Web SSO Configuration then do the configuration as follows.
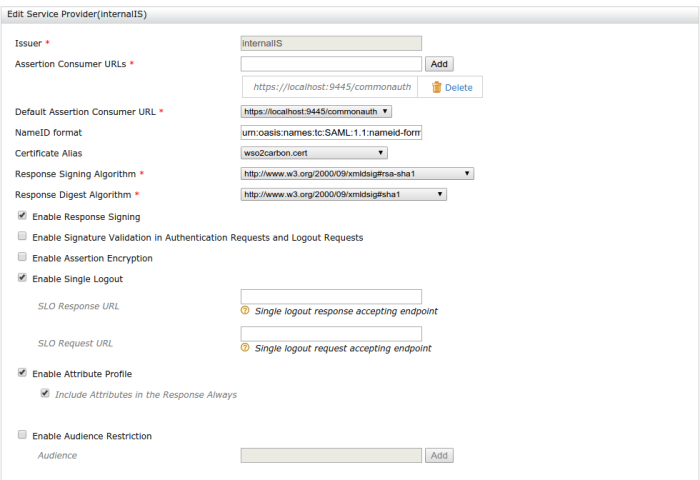
Save the configuration.
Step 4: Testing the authentication
Now if you add a user to the internal IS, you should be able to log in with the user even though you have configured the service provider in the external IS.
The basic HTTP header flow is as follows.
| http://localhost:8080/travelocity.com | 1. User visits travelocity webpage |
| http://localhost:8080/travelocity.com/samlsso?SAML2.HTTPBinding=HTTP-Redirect | 2. User clicks on the login with SAML hyperlink |
| https://localhost:9445/samlsso?SAMLRequest=**** | 3. User is directed to the external IS |
| https://localhost:9443/samlsso?SAMLRequest=**** | 4. User is directed to the login page of the internal IS from the external IS |
| https://localhost:9443/samlsso | 5. User logs in |
| https://localhost:9445/commonauth | 6. Logged in user is redirected back to external IS |
| https://localhost:9445/samlsso?sessionDataKey=**** | 7. User is given a session data key and is considered a logged in user |
Hope this helps, this would prove useful in scenarios where the service provider has to be registered in one IS while the LDAP has been configured to another IS. Do drop a comment if you come across any issues :)