Configuring WSO2 SMSOTP Connector

This topic provides instructions on how to configure the SMSOTP and the Identity Server to integrate using a sample app. This is an updated version of the WSO2 article found here. The current SMSOTP connector can be easily used with nexmo but difficult to integrate with other SMS APIs. I have updated the connector to be easily integrable with most SMS APIs on the market. This is the updated documentation of the connector. 

Building the SMSOTP artifacts

  1. Clone the repository from https://github.com/Pulasthih/is-connectors
  2. Navigate to components/smsotp and build the two artifacts using mvn clean install.

Deploying SMSOTP artifacts

  1. Place the smsotpauthenticationendpoint.war file into the <IS_HOME>/repository/deployment/server/webapps directory.
  2. Place the  org.wso2.carbon.identity.authenticator.SMSOTP-1.0.0.jar file into the <IS_HOME>/repository/components/dropins directory.

Configuring the SMSOTP provider

The SMS provider is the entity that will be used to send SMS. The SMSOTP connector has been configured such that it can be used with most types of SMS APIs. Some use the GET method with the client secret and API Key being encoded in the URL (eg: Nexmo) whereas some may use the POST method while sending the values in the headers and the message and telephone number in the payload (eg: Clickatell). Note that this could change significantly between different SMS providers. The configuration of the Identity Server would also change along with this.

Deploying travelocity.com sample

The next step is to deploy the sample app in order to use it in this scenario.

Once this is done, the next step is to configure the WSO2 Identity Server by adding an identity provider and service provider.

Configuring the identity provider

Now you have to configure WSO2 Identity Server by adding a new identity provider.

  1. Download the WSO2 Identity Server from here and run it.
  2. Log in to the management console as an administrator.
  3. In the Identity section under the Main tab of the management console, click Add under Identity Providers.
  4. Give a suitable name (eg: SMSOTP) as the Identity Provider Name.
  5. Go to SMSOTP Configuration under Federated Authenticators .
  6. Select both checkboxes to Enable SMSOTP Authenticator and make it the Default .
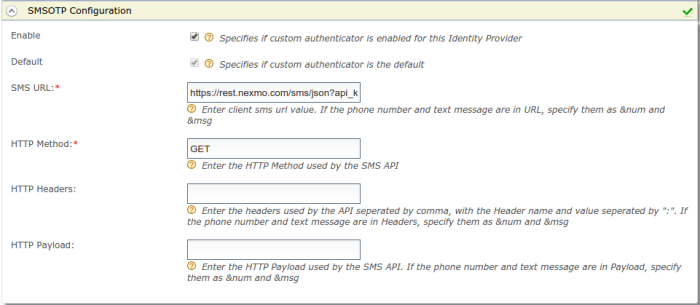
  7. Enter the SMS Url and the HTTP Method used (eg: GET or POST). Include the headers and payload if the API uses any. If the text message and the phone number are passed as parameters in any field, then include them as &msg and &num respectively.

Note: If nexmo is used as the SMS provider, the nexmo API requires the parameters to be encoded in the URL, so the SMS URL would be as follows,

https://rest.nexmo.com/sms/json?api_key=*********&api_secret=********&from=NEXMO&to=&num&text=&msg

*The api key and api secret are provided when you register with nexmo.
nexmo

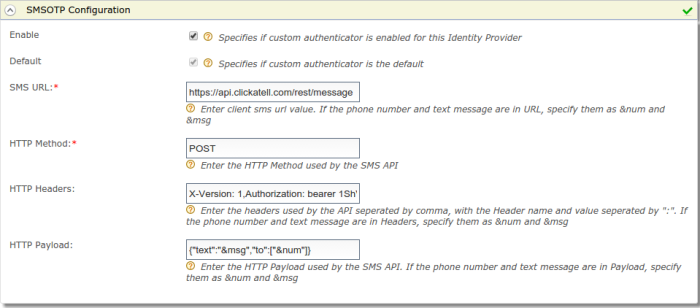
Note: If clickatell is used as the SMS provider, clickatell uses a POST method with headers and the text message and phone number being sent as the payload. So the fields would be as follows.

SMS URL: https://api.clickatell.com/rest/message

HTTP Method: POST

HTTP Headers: X-Version: 1,Authorization: bearer ********,Accept: application/json,Content-Type: application/json

HTTP Payload: {“text”:”&msg“,”to”:[“&num“]}

*The auth token is provided when you register with clickatell.
clickatell8. Click Register .

You have now added the identity provider.

Configuring the service provider

The next step is to configure the service provider.

1. Return to the management console.

2. In the Identity section under the Main tab, click Add under Service Providers .

3. Enter travelocity.com in the Service Provider Name text box and click Register .

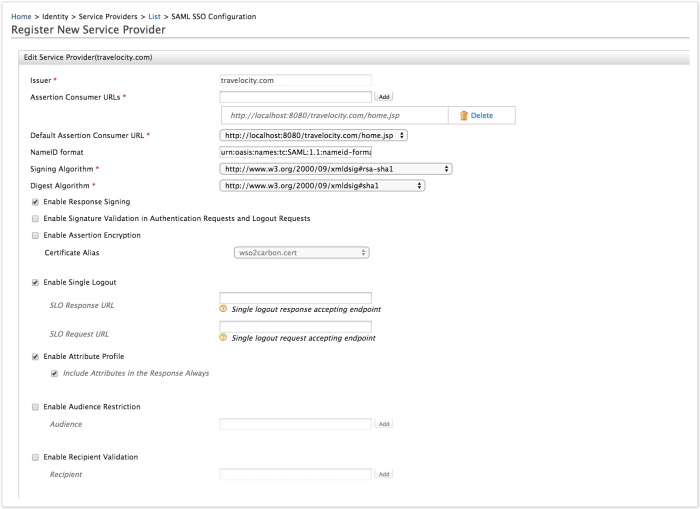
4. In the Inbound Authentication Configuration section, click Configure under the SAML2 Web SSO Configuration section.
3

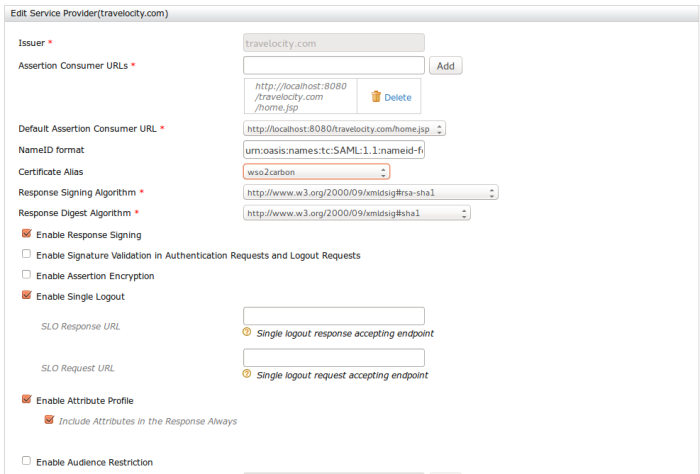
5. Now set the configuration as follows:

6. Select the following check-boxes:

  • Enable Response Signing
  • Enable Single Logout
  • Enable Attribute Profile
  • Include Attributes in the Response Always

7. Click Update to save the changes. Now you will be sent back to the Service Providers page.

8. Go to Claim configuration and select the mobile claim.

4

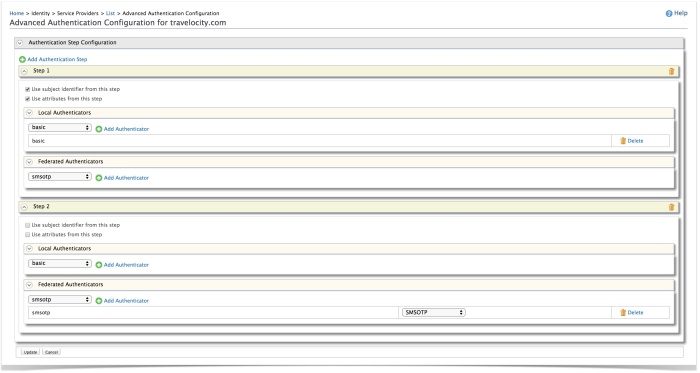
9. Go to Local and Outbound Authentication Configuration section.

10. Select the Advanced configuration radio button option

11. Add the basic authentication as first step and SMSOTP authentication as second step
5

You have now added and configured the service provider.

Configuring User Claim

  1. Select Users and Roles in the IS Management Console
  2. Go to Users → admin →User Profile  and  update the mobile number. ( If nexmo is used, this number must be registered with nexmo in order to send sms).

Testing the sample

1. To  test the sample, go to the following URL: http://localhost:8080/travelocity.com 

2. Click the link to log in with SAML from WSO2 Identity Server.

3. Basic authentication page will be visible, use your IS username and password.

4. You will get a token to your mobile phone.Type the code to authenticate, You will be  taken to the home page of the travelocity.com app
Federated authentication between two Identity Servers

In this post I shall be explaining how federated authentication can be used to redirect the authentication of a user to another Identity Server.

Download the Identity Server from here, if you have not done so already. The installation guide can be found here.

Checkout the repository of the travelocity SSO sample from the link below, follow these instructions to checkout a folder.

https://github.com/wso2/product-is/tree/master/modules/samples/sso

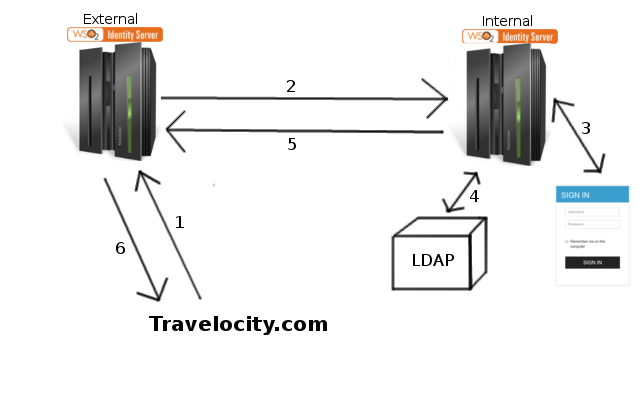
In this tutorial we will be using two Identity Server instances namely an internal IS running on port 9443, and an external IS running on port 9445. Check this post if you need more information on how to run multiple Identity Servers on different ports. The travelocity sample will be deployed on tomcat. The travelocity webapp will redirect the login to the external IS, which again will redirect the authentication to the internal IS. The stepwise scenario is as follows.

  1. User visits the travelocity website and clicks to login through SAML SSO then the user is redirected to the external IS.
  2. The external IS redirects the authentication to the internal IS.
  3. The internal IS login screen is displayed and the user enters the credentials.
  4. The user credentials are checked against the LDAP of the internal IS.
  5. If authenticated, the user is redirected back to the external IS.
  6. The external IS redirects the user back to travelocity website as a logged in user.

dfdf

Step 1: Travelocity.properties

Go to the directory you saved the sample in and open src/main/resources/travelocity.properties. Check if the the configuration is as below and change the port of the IdPURL to 9445.

SAML2.SPEntityId=travelocity.com

SAML2.AssertionConsumerURL=http://localhost:8080/travelocity.com/home.jsp

SAML2.IdPEntityId=localhost

SAML2.IdPURL=https://localhost:9445/samlsso

Step 2: External IS Configuration

The external IS should have a new Identity Provider configured to federate the users to the internal IS. It should also have a service provider configured to identify the webapp.

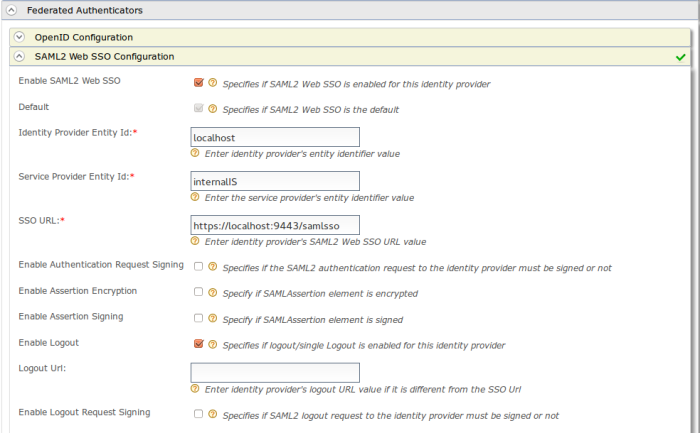
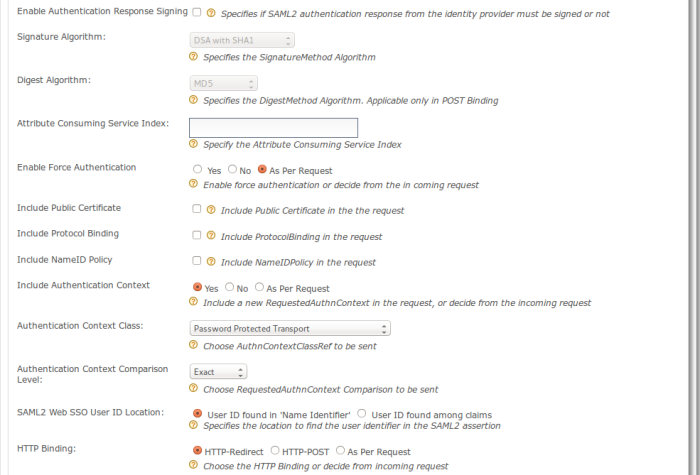
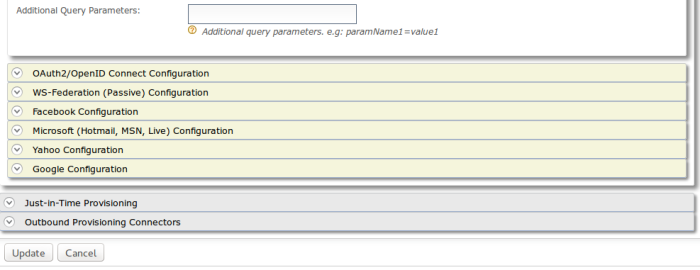
  1. Add a new Identity Provider in the internal IS. Give a name and expand Federated Authenticators then SAML2 Web SSO Configuration. Do the configuration as follows. 

123.png

Save the configuration.

  1. Add a new Service Provider and click on Configure under Inbound Authentication Configuration -> SAML2 Web SSO Configuration then do the configuration as follows.

45Expand the Local & Outbound Authentication Configuration, then click on the  Federated Authentication radio button then select the identity provider you configured from the drop down.

6

Save the configuration.

Step 3: Internal IS Configuration

A new service provider needs to be configured in the Internal IS with the external IS as the Assertion Consumer URL.

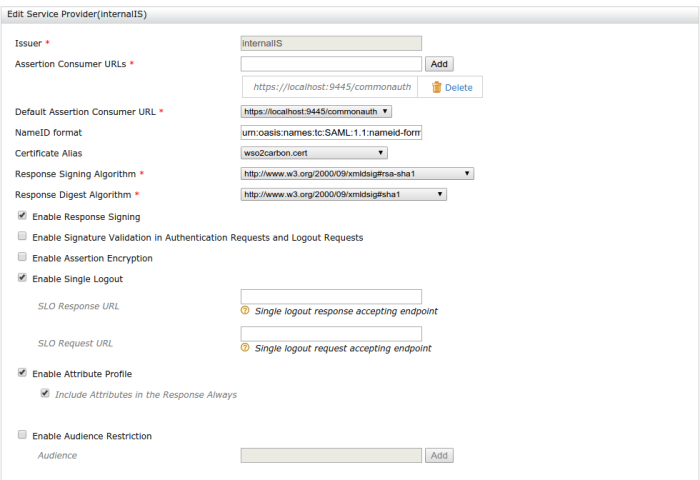
Add a new Service Provider and click on Configure under Inbound Authentication Configuration -> SAML2 Web SSO Configuration then do the configuration as follows.

89

Save the configuration.

Step 4: Testing the authentication

Now if you add a user to the internal IS, you should be able to log in with the user even though you have configured the service provider in the external IS.

The basic HTTP header flow is as follows.

http://localhost:8080/travelocity.com 1. User visits travelocity webpage
http://localhost:8080/travelocity.com/samlsso?SAML2.HTTPBinding=HTTP-Redirect 2. User clicks on the login with SAML hyperlink
https://localhost:9445/samlsso?SAMLRequest=**** 3. User is directed to the external IS
https://localhost:9443/samlsso?SAMLRequest=**** 4. User is directed to the login page of the internal IS from the external IS
https://localhost:9443/samlsso 5. User logs in
https://localhost:9445/commonauth 6. Logged in user is redirected back to external IS
https://localhost:9445/samlsso?sessionDataKey=**** 7. User is given a session data key and is considered a logged in user

Hope this helps, this would prove useful in scenarios where the service provider has to be registered in one IS while the LDAP has been configured to another IS. Do drop a comment if you come across any issues :)

User Provisioning between two WSO2 Identity Servers

featured

In this post I shall be explaining how users can be provisioned between two different Identity Server instances.

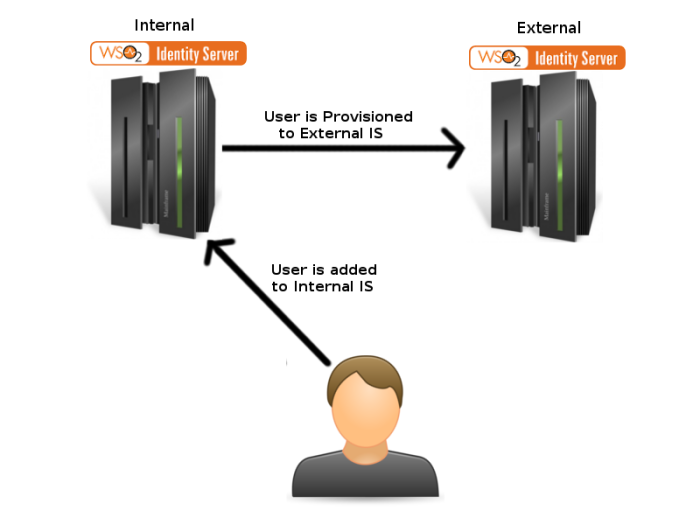
User provisioning is a process which simplifies the creation and management of users on multiple systems. With user provisioning, when the user is added to the WSO2 LDAP, the system creates user accounts for the user on many different systems,. This eliminates the need for user accounts to be manually created in these systems. In this tutorial I will demonstrate how this functionality can be done between two WSO2 Identity Server instances. So ultimately when a user is added in one IS, the same user will be provisioned to the other.

Download the Identity Server from here, if you have not done so already. The installation guide can be found here.

In this example I shall be using two IS instances running locally on two different ports 9443 and 9445. If you need more information on how to change the running ports of WSO2 products, check my blog post on “Changing the Ports of WSO2 Servers

For the purposes of this tutorial, one IS shall be referred to as the Internal IS and the other as the External IS. The internal IS in this tutorial is running on port 9443 while the external IS is running on port 9445. Our ultimate objective is: when a user is added to the internal IS the same user shall be provisioned to the external IS.

Start the two Identity Servers and login to their management consoles and do the configurations as below.

Step 1: Configuring the Internal IS

  • Click on Add under Identity Providers on the left pane.
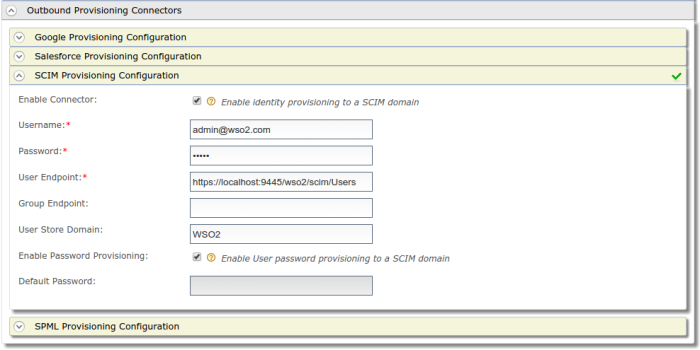
  • Give a name and expand the Outbound Provisioning Connectors and under that the SCIM Provisioning Configuration.
  • Check the Enable Checkbox and give the Username and Password of the External IS.
  • Give the user endpoint of the external IS, this is by default https://<HOST&gt;:<PORT>/wso2/scim/Users. (This value can also be found by expanding the Inbound Provisioning Configuration of the Resident Identity Provider in the External IS)
  • Give the User Store Domain as WSO2
  • Check the Enable User password provisioning to a SCIM domain checkbox.

1

  • Save the configuration
  • Click on List under Service Providers on the left pane then click on the Resident Service Provider link.
  • Expand Outbound Provisioning Configuration and select the Identity Provider you configured from the drop down menu then click on the plus icon.
  • Then update the configuration.

2

Step 2: Configuring the External IS

  • Click on List under Service Providers on the left pane then click on the Resident Service Provider link.
  • Expand the Inbound Provisioning Configuration and select the userstore domain to provision users to.
  • Then update the configuration

3

Step 3: Testing the provisioning

Now the configuration is complete. Hence when you add a user to the internal IS, the user should get provisioned to the external IS. I have added a user named testuser@wso2.com through the management console to the internal IS, the log entries of the internal and external Identity Servers are given below.

Internal IS

[2016-02-05 16:33:42,181]  INFO {org.wso2.carbon.identity.scim.common.impl.ProvisioningClient} –  SCIM – create user operation returned with response code: 201

External IS

[2016-02-05 16:33:42,092]  INFO {org.wso2.carbon.identity.scim.provider.impl.SCIMUserManager} –  User: PRIMARY/testuser@wso2.com is created through SCIM.

Now if you login to the external IS management console and navigate to List under Users and Roles, you will see that a user called testuser@wso2.com has been added.

Troubleshooting

Sometimes you may get the following error when adding a user to the internal IS.

ERROR {org.wso2.carbon.user.core.common.AbstractUserStoreManager} –  Error occurred while accessing Java Security Manager Privilege Block

This is caused as a result of the new Identity Provider configuration not being saved properly. In this case, first delete the identity provider entry from the Outbound Provisioning Configuration of the Resident Service Provider of the internal IS and Update it. Then delete the Identity Provider from the list of Identity Providers then follow step 1 again.

Hope this helps, do drop a comment if you come across any issues. Good Luck! :)

IDP Initiated SSO vs SP Initiated SSO

When working with SSO with SAML, it is vital that one understands the difference between Identity Provider Initiated Single Sign On and Service Provider Initiated SSO. Before that, it’s important to understand who Identity Providers and Service Providers are and their differences.

Given below are the definitions from the OASIS Organization that created SAML.

“An Identity Provider is a kind of provider that creates, maintains, and manages identity information for principals and provides principal authentication to other service providers within a federation, such as with web browser profiles”

“A Service Provider is a role donned by a system entity where the system entity provides services to principals or other system entities”

In the context of this discussion, an Identity Provider is basically an entity that provides authentication for it’s users, whereas the webapp using this service could be called as the Service Provider.  In the Travelocity Sample in my previous post, travelocity.com is the SP whereas the WSO2 Identity Server is the IDP.

Now the difference between IDP Initiated SSO and SP Initiated SSO is quite simple. In SP Initiated SSO, the Single Sign On process is initiated by the web application. The user first visits the webapp, then the user is redirected to the IDP along with an AuthnRequest generated at the SP. The Travelocity Sample in my previous post is a classic example of this scenario. When the user visits http://localhost:8080/travelocity.com, and when he clicks on the hyperlink to login with SAML, the webapp initiates the SSO process with an AuthnRequest. A sample of the AuthnRequest sent is given below.

<samlp:AuthnRequest xmlns:samlp="urn:oasis:names:tc:SAML:2.0:protocol"
                    AssertionConsumerServiceURL="http://localhost:8080/travelocity.com/home.jsp"
                    Destination="https://localhost:9443/samlsso"
                    ForceAuthn="false"
                    ID="0"
                    IsPassive="false"
                    IssueInstant="2016-01-18T12:36:02.365Z"
                    ProtocolBinding="urn:oasis:names:tc:SAML:2.0:bindings:HTTP-POST"
                    Version="2.0"
                    >
    <samlp:Issuer xmlns:samlp="urn:oasis:names:tc:SAML:2.0:assertion">concurUSD</samlp:Issuer>
    <saml2p:NameIDPolicy xmlns:saml2p="urn:oasis:names:tc:SAML:2.0:protocol"
                         AllowCreate="true"
                         Format="urn:oasis:names:tc:SAML:2.0:nameid-format:persistent"
                         SPNameQualifier="Issuer"
                         />
    <saml2p:RequestedAuthnContext xmlns:saml2p="urn:oasis:names:tc:SAML:2.0:protocol"
                                  Comparison="exact"
                                  >
        <saml:AuthnContextClassRef xmlns:saml="urn:oasis:names:tc:SAML:2.0:assertion">urn:oasis:names:tc:SAML:2.0:ac:classes:PasswordProtectedTransport</saml:AuthnContextClassRef>
    </saml2p:RequestedAuthnContext>
</samlp:AuthnRequest>

The AuthnRequest contains important information such as the Assertion Consumer URL, the issuer and the NameID Format which is required by the IDP to identify where to redirect the request. Having authenticated the user, the IDP responds with a SAML Response and the process is similar for both types after this.

On the other hand, when using IDP Initiated SSO, the user does not go through the webapp first, but rather is directed to the IDP. So the first thing the user sees is the authentication page of the IDP. This is done by using a query string along with the URL.

The sample URL with the query string used by the WSO2 IS running on localhost port 9443, is given below.

https://localhost:9443/samlsso?spEntityID=<sp-issuer&gt;

Here the <sp-issuer> is the Issuer value we define when creating a Service Provider in the WSO2 IS Management Console.

So in the same travelocity example, if I want to use IDP Initiated SSO, the first thing that needs to be done is to “Enable IdP Initiated SSO” in the Service Provider configuration in the WSO2 IS. This is done by selecting the Service Provider “travelocity.com” from the list of SPs, then Inbound Authentication Configuration -> SAML2 Web SSO Configuration. Then click on edit, then check the “Enable IdP Initiated SSO” check-box at the very bottom. The save the configuration.

Now instead of having to go through http://localhost:8080/travelocity.com, and having to click on the SAML 2 hyperlink, the user can directly go to the URL given below and he shall be directed to the WSO2 IS authentication page.

https://localhost:9443/samlsso?spEntityID=travelocity.com

Both these methods are equally used in real life and the choice of one over the other, depends heavily on the requirement of the user.

Hope you enjoyed the post, do drop a comment if I’ve missed anything :)