In this post I shall be explaining how users can be provisioned between two different Identity Server instances.
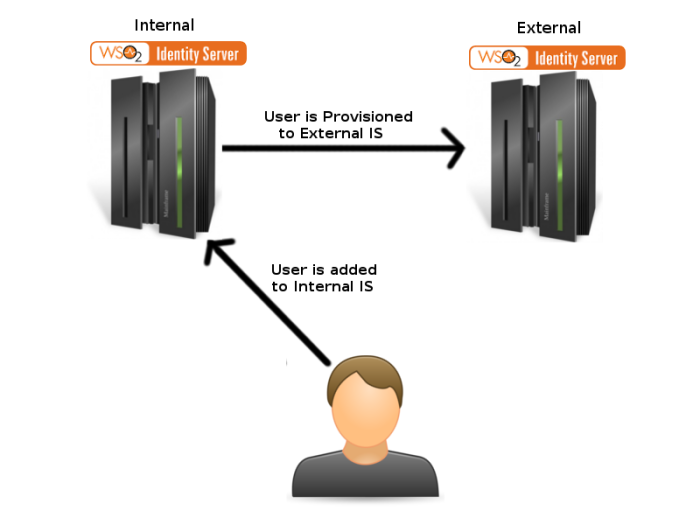
User provisioning is a process which simplifies the creation and management of users on multiple systems. With user provisioning, when the user is added to the WSO2 LDAP, the system creates user accounts for the user on many different systems,. This eliminates the need for user accounts to be manually created in these systems. In this tutorial I will demonstrate how this functionality can be done between two WSO2 Identity Server instances. So ultimately when a user is added in one IS, the same user will be provisioned to the other.
Download the Identity Server from here, if you have not done so already. The installation guide can be found here.
In this example I shall be using two IS instances running locally on two different ports 9443 and 9445. If you need more information on how to change the running ports of WSO2 products, check my blog post on “Changing the Ports of WSO2 Servers”
For the purposes of this tutorial, one IS shall be referred to as the Internal IS and the other as the External IS. The internal IS in this tutorial is running on port 9443 while the external IS is running on port 9445. Our ultimate objective is: when a user is added to the internal IS the same user shall be provisioned to the external IS.
Start the two Identity Servers and login to their management consoles and do the configurations as below.
Step 1: Configuring the Internal IS
- Click on Add under Identity Providers on the left pane.
- Give a name and expand the Outbound Provisioning Connectors and under that the SCIM Provisioning Configuration.
- Check the Enable Checkbox and give the Username and Password of the External IS.
- Give the user endpoint of the external IS, this is by default https://<HOST>:<PORT>/wso2/scim/Users. (This value can also be found by expanding the Inbound Provisioning Configuration of the Resident Identity Provider in the External IS)
- Give the User Store Domain as WSO2
- Check the Enable User password provisioning to a SCIM domain checkbox.
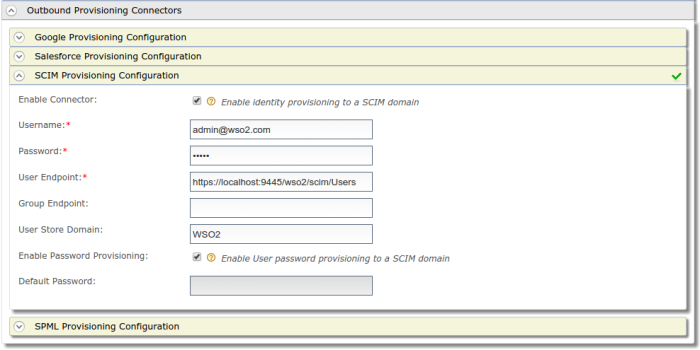
- Save the configuration
- Click on List under Service Providers on the left pane then click on the Resident Service Provider link.
- Expand Outbound Provisioning Configuration and select the Identity Provider you configured from the drop down menu then click on the plus icon.
- Then update the configuration.

Step 2: Configuring the External IS
- Click on List under Service Providers on the left pane then click on the Resident Service Provider link.
- Expand the Inbound Provisioning Configuration and select the userstore domain to provision users to.
- Then update the configuration

Step 3: Testing the provisioning
Now the configuration is complete. Hence when you add a user to the internal IS, the user should get provisioned to the external IS. I have added a user named testuser@wso2.com through the management console to the internal IS, the log entries of the internal and external Identity Servers are given below.
Internal IS
[2016-02-05 16:33:42,181] INFO {org.wso2.carbon.identity.scim.common.impl.ProvisioningClient} – SCIM – create user operation returned with response code: 201
External IS
[2016-02-05 16:33:42,092] INFO {org.wso2.carbon.identity.scim.provider.impl.SCIMUserManager} – User: PRIMARY/testuser@wso2.com is created through SCIM.
Now if you login to the external IS management console and navigate to List under Users and Roles, you will see that a user called testuser@wso2.com has been added.
Troubleshooting
Sometimes you may get the following error when adding a user to the internal IS.
ERROR {org.wso2.carbon.user.core.common.AbstractUserStoreManager} – Error occurred while accessing Java Security Manager Privilege Block
This is caused as a result of the new Identity Provider configuration not being saved properly. In this case, first delete the identity provider entry from the Outbound Provisioning Configuration of the Resident Service Provider of the internal IS and Update it. Then delete the Identity Provider from the list of Identity Providers then follow step 1 again.
Hope this helps, do drop a comment if you come across any issues. Good Luck! :)
