This post is on how you can configure SAML 2 based SSO for Atlassian JIRA, using the WSO2 Identity Server as the Identity Provider. Note that this configuration is very similar to the configuration for Confluence, which can be found here, since both Confluence and JIRA are products of Atlassian.
Prerequisites
WSO2 Identity Server
The WSO2 Identity Server download link and the installation guide are given below,
Atlassian JIRA
The JIRA download link and installation guide and given below. This tutorials has been tested with the JIRA Version 6.4, slight modifications might be required for other versions.
LastPass JIRA SAML Plugin
The plugin is required to configure SAML 2.0 SSO for JIRA. The download link is given below and the installation guide can be found in the file named INSTALL in the main folder.
IMPORTANT: Step 1 should be completed before the plugin installation as the plugin installation disables the default user login process which makes it difficult to do configurations inside the JIRA dashboard.
Step-by-Step Process
Step 1: Configuring JIRA LDAP
This step requires a working knowledge on LDAP, follow this link if you are unfamiliar with the concept.
JIRA by default uses an internal LDAP to keep track of the users and permissions. In order to integrate the WSO2 IS with JIRA, both LDAPs should point to the same LDAP instance. Here we are configuring the JIRA LDAP instance to point to the WSO2 IS LDAP.
- Once inside the JIRA dashboard, click on the cog icon, on the top pane and select User Management.
- Click on the User Directories link on the left-hand pane.
- Select Add Directory then select LDAP from the drop down menu.
- The configuration is given below


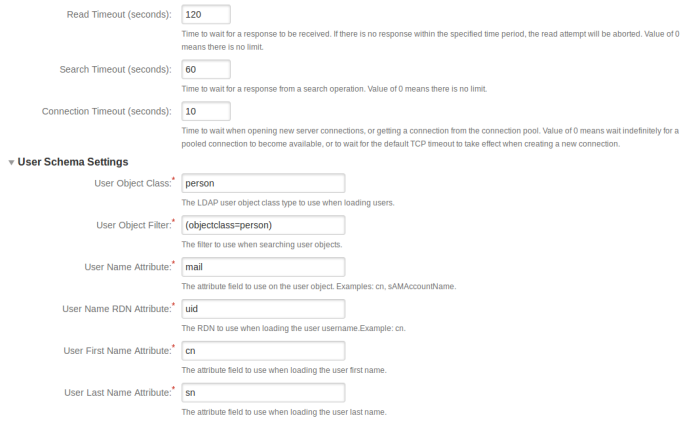
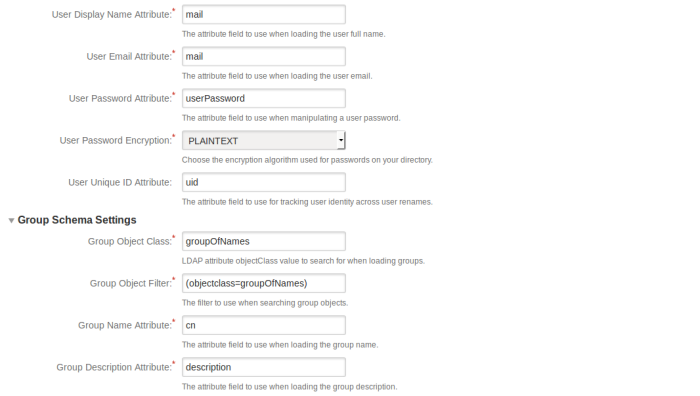

Test the configuration while having the WSO2 IS running. Then save.
NOTES
- This configuration was done after configuring the WSO2 IS to accept email authentication. The configuration would slightly change unless this is done. See here for more information.
- WSO2 IS by default uses port 10389 for the LDAP, this can be changed by changing the <IS_HOME>/repository/conf/user-mgt.xml file.
Step 2: Configuring JIRA
- Stop JIRA and install the LastPass plugin.
- Change the name of idp-metadata.xml.sample to idp-metadata.xml and sp-metadata.xml.sample to sp-metadata.xml. These two files are found in your <JIRA_HOME> directory.
- Change the <JIRA_HOME>/idp-metadata.xml as follows
- Change the entityID value to the issuer name you will be configuring the Service Provider in your IdP with. For this tutorial we will be setting this as “LastPass-JIRA”.
- Replace the <md:SingleSignOnService….> tag with
<md:SingleSignOnService
Binding="urn:oasis:names:tc:SAML:2.0:bindings:HTTP-Redirect"
Location="https://localhost:9443/samlsso"/>
- Add this after the replacement
<md:SingleSignOnService
Binding="urn:oasis:names:tc:SAML:2.0:
bindings:HTTP-POST"
Location="https://localhost:9443/samlsso"/>
- Replace the <md:SingleLogoutService….> tag with
<md:SingleLogoutService
Binding="urn:oasis:names:tc:SAML:2.0:
bindings:HTTP-Redirect"
Location="https://localhost:9443/samlsso"
ResponseLocation="https://localhost:9443/samlsso"/>
- Replace the “cert-goes-here” between the <ds:X509Certificate> tags with your certificate. WSO2 IS default certificate can be found here.
(Use without the –BEGIN– and –ENG– tags)
NOTE: The edited idp-metadata.xml file should look like this.
4. Change the <JIRA_HOME>/sp-metadata.xml as follows
- Change the entityID to the issuer value as above, in this case to “LastPass-JIRA”.
- Replace “http://jira.example.com ” with your JIRA URL, in this case that is “http://localhost:PORT ” . Replace PORT with the port JIRA is running on, by default it is 8080. I have configured JIRA with port 8070.
NOTE: The edited sp-metadata.xml file should look like this.
5. Add the following line after initializing “originalURL” in <JIRA_HOME>/atlassian-jira/saml_acs.jsp
originalUrl = “/secure/Dashboard.jspa“;
Step 3: Configuring WSO2 IS
- Select Add under the Service Provider section on the left pane.
- Give a name and register the Service Provider.
- Click on “Inbound Authentication Configuration” under that click on “SAML Web SSO Configuration”. Then click on “Configure”
- Give the following values
- Issuer = LastPass-JIRA (The value has to equal the value we gave for issuer in Step 2)
- Assertion Consumer URL = http://localhost:8070/saml_acs.jsp
- Check “Use fully qualified username in the NameID”
- Check “Enable Response Signing“
- Check “Enable Assertion Signing”
- Check “Enable Single Logout“
- Click Register then update.
Step 4: Patch the WSO2 IS
The Identity Server needs to be patched to include an attribute of the authentication statement. This is an optional attribute according to the SAML Specification, so the IS does not set it. The plugin searches for this attribute and throws an error if it is unavailable.
Add the following line in the buildSAMLAssertion() method after initializing the authStmt in this class,
authStmt.setSessionNotOnOrAfter(notOnOrAfter);
Step 5: Run the Server
Now we are all set, run JIRA and the WSO2 IS. The JIRA default url should redirect you to the WSO2 IS authentication page. When you enter the credentials, you will be redirected to the JIRA Dashboard of the logged in user.
Troubleshooting
Hope this helps, do drop a comment if there’s any thing you need clarified. Have fun!

